Mahanandi

Living in Consciousness ~ Indi(r)a’s Food and Garden Weblog

Banana – Walnut Cake

We had a three day holiday for Memorial Day, and this is how we spent the weekend:

Saturday- shopping, cleaning the house, preparing dinner with my husband Vijay’s help. Our Nandyala family friend and his college friends came all the way from Milwaukee. They made a pit stop at our house before reaching their final destination – SV temple, Pittsburgh.

For dinner, we prepared puri, rice, chana masala, chicken kurma, Boiled eggs sautéed in red chilli-garlic powder, peanut chutney, sambhar, papads, raita with yogurt, and for dessert banana-walnut cake and fruit (cantaloupe). It was so hectic; I couldn’t find time to take pictures of preparation and finished items.

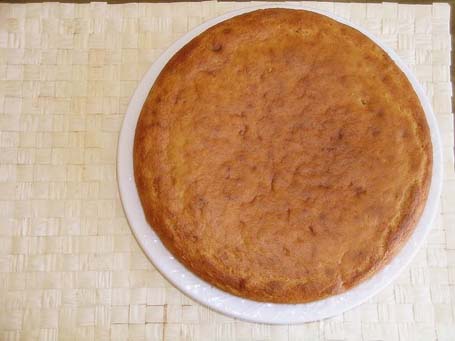
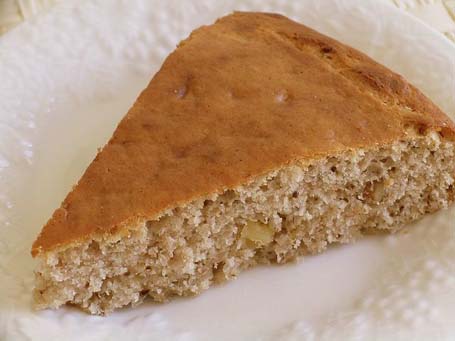
Sunday- helped our friends who came here from India just one month back, move to Detroit. Packing, cleaning etc. Baked again another banana-walnut cake for them. Managed to take some pictures of cake.

Monday- We have planned to go to Pittsburgh for diva darshanam at the SV temple. But it was raining so hard, and I didn’t want to travel on the PA Turnpike, which is notorious for accidents. So instead we hit some local shops nearby, and dined out.

First long weekend of summer was over just like that.

Banana-Walnut cake

As much as possible, I try to avoid using eggs in my baking for cakes etc. Because I don’t like the strong chemical smell of egg yolks. It wasn’t like that back in India, but after coming here, the yolk smell and taste has started to make me very ill. I don’t know what they feed the hens here in US, the fertilizer smell of egg yolks is unbearable, and the taste, oy…awful to say the least.

I found out that very ripe bananas are good substitute for eggs, so I use them often in my cake and bread making.

1 cup Bisquick pancake flour. All-purpose flour works fine too. (The only reason I made the cake with Bisquick is because I wanted to finish off the big packet of Bisquick pancake flour that I purchased at Costco last year.)
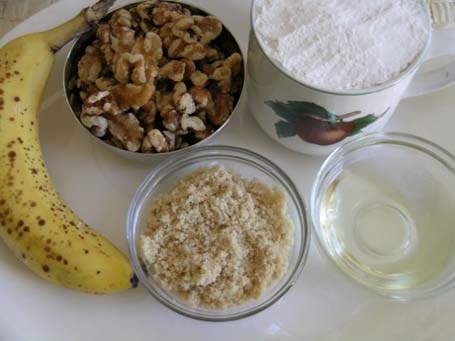
1/2 cup – walnuts, chopped
1 banana, skin peeled, and ripe fruit mashed smoothly
1/4 cup – sugar
4 tablespoons – oil or ghee
1 tsp each, – baking powder and vanilla extract
Milk if needed

Banana-walnut cake Ingredients

You must be familiar with the baking drill. Wet first, dry next, and then combine the two together.

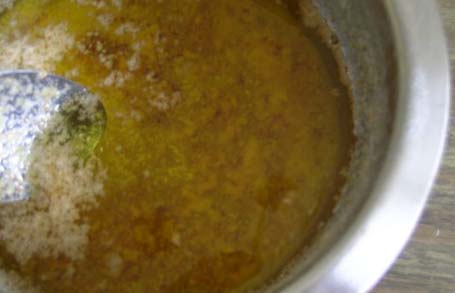
IN a big bowl, mix the wet ingredients – banana, oil and vanilla extract. Whisk to combine well.
Then add the flour, sugar, walnuts and baking powder. Combine thoroughly. If the batter looks tight, then add about quarter cup of water or milk.

Preheat the oven to 350 F.

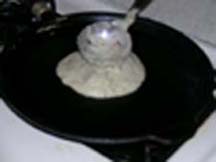
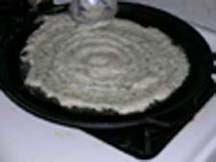
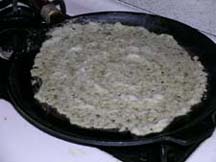
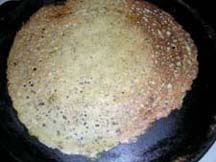
Prepare the cake pan, by applying ghee or oil on the bottom and to the sides. Pour the cake batter. Spread evenly. Bake at 350° F for about 30 to 45 minutes. When a toothpick inserted into the baked cake, it should come out clean. Cool and then cut pieces. Enjoy.

Banana-Walnut cake

Light and Fluffy, Almost Egg-less, Good Tasting Banana-Walnut Cake

Slice of cake

Posted by Indira©Copyrighted in All-Purpose Flour(Maida),Bananas,Sugar,Walnuts (Tuesday May 31, 2005 at 8:38 am- permalink)
Comments (55)

The New Home of Mahanandi: www.themahanandi.org

Memorial Day Observance

A day will come when there will be no one left who knew the men and women buried here.” –

President Bush today at Arlington National Cemetery(last paragraph).

Posted by Indira©Copyrighted in Zen (Personal) (Monday May 30, 2005 at 7:07 pm- permalink)
Comments (3)

The New Home of Mahanandi: www.themahanandi.org

Weekend Cat Blogging

Kittaya on the deckwall. He just learned to climb and jump on to the post.

Kittaya standing on the deck wall

Posted by Indira©Copyrighted in Kittaya (Sunday May 29, 2005 at 2:54 pm- permalink)
Comments (6)

The New Home of Mahanandi: www.themahanandi.org

Glorious Golden Ghee (Neyyi)

To prepare authentic Indian meals, you have to make the ghee first. North, south, east and west, people all over in India know ghee is the best, and they love it. All auspicious occasions in life starts with ghee in India. Be it an offering to God, or the babies first solid food – people lavish their love with ghee.

Ghee is as easy to make as it sounds. This is how I usually make ghee here: I would buy one pound (four sticks) of unsalted butter. If you are lucky enough to find bovine-hormone free, organic butter, the ghee prepared from it would be better tasting and more like what we can get in India. Ghee from the four sticks lasts for about three to six months for us.

Take a heavy bottomed vessel. Place the butter sticks in it, and on medium heat melt them. When the butter starts to melt, there will be lot of bubbling and gurgling. Don’t panic. Reduce the flame to low; in a few minutes this action will subside. Next the butter will begin to develop foam at the top.

Simmer on low heat, uncovered and undisturbed, for 30 to 45 minutes, until milk-solids on the bottom of the vessel turn from white to beige-brown, and butter on top becomes transparent like clear water. This is the signal to turn off the heat. Please take caution not to burn the bottom part. That would lead to scalded milk smell, and it would stick. All the effort would be a waste and you have to throw everything away. So never use high-heat to make ghee.

What happening was milk-solids separating into 3 layers. Foaming milk-solids on top, clarified butter in the middle, protein milk-solids on the bottom.

After turning off the heat, do not cover with lid. Let the ghee stand for ten minutes. Remove any crust that rises to the surface with a spoon. Strain, discarding the milk solids at the bottom of the vessel, using a coffee filter or muslin cloth (gangi gudda). Or simply ladle off the clean water like ghee into a dry jar. Let it reach to room temperature. Then cover with a lid. Store at room temperature.

Removing the solids from the ghee with a spoon

When first made or heated, ghee will look clear, like golden oil. At room temperature it will be in kova or fudge like consistency. It would turn to solid block when exposed to extreme cold temperature. To use, take necessary amount with a dry spoon and add to the food. Moisture spoils the ghee, so never use a wet spoon when handling ghee.

What I do with ghee:

1. Drizzle one teaspoon of ghee on hot cooked rice. Anything with rice tastes so much better with ghee, particularly the dal, sambhar and rasam.
2. To prepare different types of pulaos/fried rice.
3. Saute spices for masala (garam masala, various types of masala and curry powders).
4. For popu or tadka (frying the cumin, mustard seeds and curry leaves in ghee).
5. To prepare sweets like payasams, bhakshalu (puran poli), burfis, kheers, halwas and laddus.
6. On toasted bread and on a boiled potato.
7. Garlic roasted in ghee, spread on the bread is garlic-bread at its best.

Anything with ghee is ghee-licious. It’s simply impossible to go wrong with ghee. For any culinary enthusiast, the authentic Indian food experience has to start with this ancient Indian staple. Try and Enjoy!

Ghee

Note:
Ghee is often equaled to clarified butter. But it’s a simple-minded simplification. The ghee making process is lengthy and the end result is more refined when compared to clarified butter. Now you know the difference, don’t you go on regurgitating same falsehoods about ghee equals to clarified butter. No, it’s not. And, for God’s sake have the decency to call it by its given name – Ghee. You can say gee, right? Add an ‘h’, and say out loud “ghee” as in geese. There you go. Thank you for indulging me about ghee.

Posted by Indira©Copyrighted in Amma & Authentic Andhra,Ghee,Milk & Products,The Essentials (Friday May 27, 2005 at 9:21 am- permalink)
Comments (72)

The New Home of Mahanandi: www.themahanandi.org

Ravish the Radish ~ Radish Curry

Fresh radishes that we get here in spring time are the best. They make a colorful curry-salad, has a bit of crunch and lots of flavor and when served with chapatis, makes a satisfying light lunch.

Recipe:

Fresh Radishes 15 to 20
Red pepper flakes 1 tsp
Salt and turmeric each 1/4 tsp
For popu or tadka: 1 tsp each mustard seeds, cumin, minced garlic & curry leaves

Radish - Bite sized piecesRadish Saute

Preparation is very simple. First, scrub and wash the radishes, remove the damaged ones. It’s not necessary to peel if they are fresh. Dice or slice them into bite-sized pieces.

In a pan, add 1 tsp of oil, do the popu, add the radishes, saute them for few minutes. Add salt and red pepper flakes, cover and cook them for few seconds. Don’t over cook them, they will turn into soggy tasteless bits. They taste better when they are served hot. You can prepare this curry while making chapatis. All it takes is 5 minutes, that’s it.

It is difficult to muster much enthusiasm for radishes, I know. But they are rich source of vitamin C and look colorful when cooked. Hold your nose and munch them for your health. That’s the way I eat my radishes.

Red radish curry with chapatis

Posted by Indira©Copyrighted in Radish,Vegetables (Thursday May 26, 2005 at 1:51 pm- permalink)
Comments (7)

The New Home of Mahanandi: www.themahanandi.org

Sambhar with white Radish(Mullangi, Mulli)

I enjoy going to flea market on weekends. I feel excited when I find a unique, useful item at a bargain price. Luckily what we have here in Ohio near our home is a flea/farmers market. We can buy stuff and fresh veggies too. Last Sunday, weather was fine and sun was out, so we decided to make a trip to the flea market. I bought cherries, white icicle radishes, red radishes, tomatoes, and cantaloupe. Vijay bought a Sony radio for 3 bucks and yes, it is working. He wanted one for his office room. I saw two very thick, aluminum, restaurant quality pans, but they have no lids, and so I decided to not buy. This is our first visit to this flea market as we recently moved here. Compared the flea market, where we used to go in Pittsburgh, this one is much bigger with lots of stalls. We went there around 9, walked for 3 hours, we still had a lot to browse. Well, the whole summer is ahead of us.

After coming home, I prepared white radish (mullangi) sambhar for our meal. They have mildly pungent taste, sweeter than the red skinned radish and they tasted delicious in sambhar.

White Icicle Radish
White Icicle Radish ~ Fresh from Farmer’s Market

Recipe:

1 cup toordal
1/4 teaspoon of turmeric
One onion (if you find pearl onions, use them as whole, about 6 to 8 ), 2 ripe tomatoes and 6 white icicle radish – sliced thinly lenghtwise
3 tsp of tamarind (imli) pulp
1/2 teaspoon of red chilli powder
1/2 teaspoon of salt or to taste
2 teaspoons of sambhar powder (Homemade or storebought)
(I added jaggery to compensate the pungent taste of radish, about a tablespoon.)

Different vegetables give different flavors to the sambhar. You can use carrots, cauliflower, capsicum, potatoes, okra, eggplant, and cucumber; choose whatever you like or combinations.

Sambhar ingredients Cooked and mashed Toordal
1. Ingredients for Sambhar ……. 2. Pressure-cooked and Mashed Toor dal

Preparation:

Pressure-cook toor dal thoroughly until it falls apart with turmeric in two cups of water. Mash the cooked dal and make smooth paste. Keep it aside.

While the toor dal is pressure-cooked, heat 1 tsp of oil in a big saucepan. When oil is hot, do the tadka. Add and crackle some mustard seeds, jeera and curry leaves. Add onions, tomatoes, white radish, sauté them until they are well-cooked.

Stir in the tamarind juice, salt, red chilli powder, sambhar powder and one glass of water. Mix well. Cover the pot with a lid. Bring the water to boil and then add the mashed toor dal. Let simmer for fifteen minutes on medium heat, stirring occasionally, till the wonderful sambhar aroma fills your kitchen.

Serve hot with rice. Don’t worry about leftover sambhar, it tastes even better the next day.

Sambhar with white radishes

Sambhar is quite popular all over South India. How did the plain dal or pappu rasam turned into Sambhar? If you are curious, read this quite interesting story.

Posted by Indira©Copyrighted in Radish,Toor Dal,Vegetables (Monday May 23, 2005 at 1:59 pm- permalink)
Comments (20)

The New Home of Mahanandi: www.themahanandi.org

Our Kittaya

Baby Kittaya

Baby kittaya

Posted by Indira©Copyrighted in Kittaya (Sunday May 22, 2005 at 8:17 pm- permalink)
Comments (4)

The New Home of Mahanandi: www.themahanandi.org

Lime Pickle

We Indians make pickle out of almost everything from mangoes to fish. “Even if we don’t have anything to eat, we can survive on pickle and rice” is the common dialogue in our Telugu movies between love struck hero and heroine. Father of the heroine always cautions her against hero, “If you marry him, you know what will happen to you, you have to live on pickles”. Pickles are that common in our household.

Lime pickle is particularly good because it is tangy and hot at the same time. Tastes good with dal, rasam and sambhar and on boiled eggs.

My version of lime pickle:

Lime Pickle

Take 12 limes. Wash and pat them dry. Take 4 out of them, cut them and squeeze the juice in a cup, keep aside. Cut the remaining 8 limes into 4 or 8 wedges depending on their size.

Mix the cut pieces with 6 teaspoons iodine free salt, and lime juice. Mix thoroughly. Take them in a clean, dry glass or porcelain jar with tight lid. Keep them tightly covered for about 4 days.

On 5th day – dry roast 1 tsp each of cumin, mustard and fenugreek (methi) seeds grind them to fine powder. Add this powder into the jar along with pinch of turmeric and 5 tsp of red chilli powder; mix thoroughly with a clean dry spoon.

Keep the lid tight for another 3 days, so that the lime wedges can absorb all the flavors and soften. (This time period depends on the thickness of lime rinds. If they are thin, they will soften up within a week and if they are thick, they would take atleast a month. My recipe is prepared with thin skinned, juicy limes and they changed from hard to firmly-soft in a short time.)

After that time period and just before serving the pickle:
Heat 4 tsp of oil, toast one teaspoon of mustard seeds in oil until they start to crackle and then turn off the heat. Bring this seasoned oil to room temperature and then add this oil to the pickle. Mix well and thouroughly. Serve and enjoy with rice, dal and ghee.

Pickling is like making jam. Take extra precaution in using the dry utensils, jar, spoons and your hands. Using the wet or damp things is a sure way to spoil the pickle.

I’d like to contribute something to SHF but I don’t know any sugary dishes with citrus except lemon juice with honey. So this is my hot not sugary citrus contribution to SHF. Thanks Stephanie for the suggestion.

To clear the confusion, Lemon in India = Lime in US.

Added on June 06:

Thin skinned and juicy limes are preferred for this type of pickle.

If you find them still firm even after 15 days – keep them undisturbed for one to two months -they will sure get softened. And you need to see that sufficient limejuice and salt is avialble for softening process. The pickle should never look dried out at any stage. Traditionally at our homes in India, minimum two months are given for pickles to soften and juiced up.

Usually finely ground pickle masala (cumin, mustard and fenugreek (methi) and red chilli powder) is added. And you can adjust the amount of this ground spice pickle masala to suit your taste.

Posted by Indira©Copyrighted in Amma & Authentic Andhra,Limes/Lemons (Friday May 20, 2005 at 10:58 am- permalink)
Comments (67)

The New Home of Mahanandi: www.themahanandi.org

Cabbage Curry (Kobi Nu Shak)

I prefer Savoy cabbage. It has a mild flavor and I recently found out it has more folic acid and beta carotenes than regular cabbage, so an extra dollar I spend on this variety is not a waste.

Savoy cabbage

Mandoline is a useful thing to have, it has a way with cabbage, don’t you agree? You can cut cabbage into thin strips in a jiff with mandoline. When I used this contraption for cabbage, I was relieved to know that I didn’t waste 19 bucks, you see, it was a middle of the afternoon, impulsive, first time purchase from HSN. Ya, sometimes I do buy things from TV shopping networks.

Back to cabbage curry…

Recipe:

I medium sized Savoy Cabbage: Cut cabbage into thin long strips. Remember cabbage reduces in volume by 60 to 70% when cooked.
1 onion, 5 green chillies finely chopped.
1/4 cup of soaked chana dal
2 tsp of coconut powder
1/2 tsp of each, salt and turmeric
popu or tadka ingredients: 1 tsp each of cumin, mustard seeds, minced garlic and curry leaves

Doing the popu and adding the soaked chanadalAdding cabbage to onions
Preparation:

First do the popu (fry mustard seeds, cumin, garlic and curry leaves in oil), then add onions, chillies and chana dal, sauté them.

Add cabbage, salt, coconut powder and turmeric, mix them together. Cover and cook the cabbage in its own moisture. It will retain more nutrients in this way, (rather than cooking it in water, draining and then adding).

Five minutes maximum, curry is done. Have it with chapati or with rice and dal.

Cabbage curry with chapati and yogurt on the side

Cabbage curry, chapatis and cup of yogurt ~ our lunch today.

Posted by Indira©Copyrighted in Cabbage,Vegetables (Wednesday May 18, 2005 at 4:16 pm- permalink)
Comments (22)

The New Home of Mahanandi: www.themahanandi.org

Lentil & Almond Burgers (Toor Dal-Badam Cutlets)

These easy to prepare no-meat burgers are great on their own or on buns. The recipe is from Eating Well magazine. I tried it today and they turned out good.

Recipe:

1 cup toordal or (recipe called for French green lentils, but I used toordal)
½ cup sliced almonds (badam)
1 tsp of salt
Vegetables:
½ cup carrots
1 onion
5 green chillies
cilantro (whatever herb you prefer, celery, thyme) finely chopped.
2 teaspoons of lemon juice
Magazine recipe also used eggs as binding agent, but I skipped the eggs.

Ingredients for lentil-almond burgers Sauteed ingredients

Preparation:

Pressure cook lentils with little water or cook lentils in water until tender, drain the water, keep aside. Meanwhile, heat 1 tsp of oil in a skillet; add carrot, onions, chillies, cilantro and almonds. Sauté them until the almonds are lightly browned. Let them cool down a little bit. Then transfer the mixture to a food processor, add the cooked lentils and salt. Pulse several times, scraping the sides, until the mixture is coarsely ground. Take this mixture into a bowl, add lemon juice, and mix it well.

patties Browning the other side

Form the lentil mixture into round patties. Heat 1 tsp of oil or ghee in a cast iron skillet. Add the patties, cook for 3 to 4 minutes on medium low, each side, until lightly browned. They are delicate; use a big spatula to turn them.

Serve them hot with ketchup.

Toordal-Almond burgers with ketchup on top
Toor dal – Almond Burger with ketchup ~ our lunch today

Recipe source:Eating Well magazine

Posted by Indira©Copyrighted in Almonds,Toor Dal (Tuesday May 17, 2005 at 5:22 pm- permalink)
Comments (16)

The New Home of Mahanandi: www.themahanandi.org

Peanut Chutney (Groundnut Chutney)

Buddala Pacchadi:

Peanut chutney is the usual accompaniment to breakfast dishes like upma, pongal, pesarattu, dosa, and vada at my home so I prepare peanut chutney quite often. Also it makes a decent substitute to coconut chutney. Fresh coconut is a premium thing here at Ohio, because of that whenever a chutney recipe is called for I usually go with home classic, a crowd pleaser and an Andhra delight ~ peanut chutney (Buddala pachadi in Telugu language).

Peanut chutney ingredients
Peanut Chutney Ingredients

Recipe:

1 cup – peanuts
5 dried red chillies
1 small onion and 1 garlic clove – sliced to big chunks
2 teaspoons – tamarind pulp or to taste
½ tsp salt or to taste
For popu or tadka – 1 tsp each – cumin, mustard seeds, urad dal and six curry leaves

First step is roasting the peanuts.

If I have some time to kill, I usually go for stove-top method.
Place an iron skillet on stove top and on medium heat, slowly roast the peanuts to golden brown color. Cool and rub the skins off. I love the roasted peanut taste produced in this slow-cooking method.

In a rush, needs to prepare quickly, then I go for microwave method.
Pick a wide and big microwave safe bowl. Place peanuts and microwave them for 2-4 minutes, uncovered. How fast the roasting process is done depends on how powerful the microwave is and the quantity of peanuts. After each minute of microwaving, remove the bowl and mix or turn the peanuts with a spoon for even cooking. Microwave again for another one minute and repeat the process. Do this until the cream colored peanuts turn to light brown color. I have to warn you though, just like in any roasting process, microwave method is also a delicate one and in a split second perfectly golden peanuts could turn to charcoal black. Please be careful and pay attention to the process, if this is your first time. Once you get the hang of it, it will be really a breeze to roast peanuts in a microwave.

Step Two:
Heat a tablespoon of oil to smoking point in an iron skillet. Add and brown dried red chillies, onion and garlic.

Wait few minutes for them to cool down. This cooling process somehow increases the chutney taste tremendously and saves the motor blade of your mixer from melting.

Take roasted peanuts in a blender/food processor. Grind to fine.
Add other ingredients, plus tamarind, salt and a cup of water.
Grind to fine consistency.
Remove the chutney to a bowl.
Do the popu or tadka (toast popu ingredients listed above, in half teaspoon of oil in a vessel), add them to the chutney. This is always the final seasoning thing we do.
Mix and serve.

For breakfast dishes like upma, dosas, idlies etc, I always make the chutney little bit watery (see the chutney photo below). If the chutney is for rice (yes, it tastes quite good with rice also) I’d make the chutney little bit tight with as little amount of water as possible. (In the first case we have to dunk the breakfast item in chutney and in second case we have to mix it with rice and shape it into a round.)

Peanut chutney
Peanut Chutney

Posted by Indira©Copyrighted in Amma & Authentic Andhra,Dry Fruits, Nuts & Seeds,Peanuts (Friday May 13, 2005 at 1:50 pm- permalink)
Comments (54)

The New Home of Mahanandi: www.themahanandi.org

Pesarattu (Moong Dal Dosa)

Pesarattu (dosa) prepared with moong dal, is the signatory breakfast of our region(Andhra Pradesh) in India. Done to golden perfection, sprinkled with chopped onions inside, served traditionally with coconut, ginger chutneys and sambhar, have 2 or 3 pesarattus for breakfast, you will be in a food induced delirious haze all day. Type of breakfast that should be prepared on a weekend and particularly enjoyful when prepared by others, and the only thing one has to do is sit, eat and praise the cook liberally for their generous ‘annapoorna‘ heart.

Recipe:

Soak 3 cups of split moong dal in water overnight (Friday night) for about 10 to 12 pesarattus. Next on Saturday morning like 10 or 11 o clock (don’t tell me that you’d enter the kitchen on a weekend earlier than that), drain water, grind the dal along with 5 to 6 green chillies, small piece of ginger and 1 tsp of salt into fine paste of medium consistency. Remove the batter, add about a teaspoon of cumin seeds and mix the batter thoroughly.

Split moong dal - Soaked in water - Grind to paste

Heat a cast iron flat pan, add 2 tsp of oil, spread it with an onion (remove the the top). This is to season the pan so that the pesarattu will comes off easily without sticking to the pan. The pan must be hot for pesarattu to come out in good shape. If you sprinkle water on the pan, it must sizzle.

Pour one ladle full of batter into the center of pan and spread it around in a circular fashion (from inside out) shaping the batter into a thin round.

ladle full of batter Spreading the batter in a round big circle

Pesarattu1 waiting for the other side to fry

Wait few seconds and sprinkle 1 tsp of oil or ghee on top and around the edges of pesarattu.

Wait for few minutes untill the bottom gets golden, then reverse it, cook the otherside now, for few seconds. Reverse it back, sprinkle finely chopped onions on the top and fold it half. Remove from the pan and serve.

First few attempts may not turn out good but don’t be discouraged. Try again. It takes time but once you get the hang of it, it’s really quite easy to prepare them, just like dosas.

I have prepared peanut chutney instead of traditional coconut and ginger chutneys. So there it is, pesarattu with peanut chutney ~ our weekend breakfast.

Pesarattu with Peanut chutney

Posted by Indira©Copyrighted in Amma & Authentic Andhra,Moong Dal (Split) (Monday May 9, 2005 at 7:31 pm- permalink)
Comments (54)

The New Home of Mahanandi: www.themahanandi.org

Raagi Malt (Raagi Ganji)

I love Raagi malt, particularly on cold rainy days like today. It’s May, still so cold here. It is like this since last week. I am waiting for the Sun to shine again.

Raagi (Finger millet, Ragi, Kelvaragu, Muthari, Nachni) is a Sanskrit word, and it is a type of millet grain cultivated in India from ancient times. Raagi is well-known to be rich in protein, calcium, iron and it is gluten free grain. At our home in India, ragi grains are sprouted, then gently roasted on low flame and milled to fine powder. With this freshly milled ragi powder, we prepare a rejuvenating drink called ragi malt or ragi ganji.

Ragi flour, milk and water boiled together and sweetened with sugar or jaggery is ragi malt – popular as poor man’s or farmers health drink because of ready availability, low prices for the grain and nutritious, filling quality. If it is good for a farmer and to an ancient Sanskrit speaking person, then it must be good for me too, so I often prepare this drink in place of coffee and tea.

Raagi flour is available at Indian grocery shops. I brought mine from India. Freshly milled and needless to say so much better than the store bought flour. Back home, my mother and mother-in-law, both prepare this drink daily. It’s a routine for them, nothing fancy or special like for us here. And they always flavor the drink with cardamom.

Ragi Flour and Mixing water into ragi flour

Recipe:
for two cups

1 tablespoon of ragi flour
1 glass of water or milk
2 tsp of sugar or powdered jaggery
1/2 tsp of powdered cardamom

Boiling the water(milk) for Ragi malt Mixing the Ragi flour solution

Preparation:

First take the ragi flour in a cup. Add half glass water slowly. Combine to smooth, lump free paste. This is essential. Do not add the flour directly to boiling water, it will clump into lumps.

In a vessel, take one glass of water or milk. Preparing this drink with milk alone is too rich for me so I usually add few drops of milk to water.

Heat till the water reaches boiling stage. Then add the dissolved ragi flour solution slowly to the boiling water (milk), continuously stirring with a spoon. This will prevent the formation of lumps. If you add the flour mix to water before the boiling stage, the flour will separate and it won’t be suitable to drinking. You have to throw it away, so wait for water (milk) to start boiling, and then add the flour mix. This step is very important in preparing the good raagi malt.

Add sugar or jaggery per your taste and pinch of cardamom (Elachi) powder. Reduce the heat to medium level, and simmer the ragi malt for 5 minutes, stirring in-between. Turn off the heat.
Let it cool to warm, and then pour into a glass or cup.

Ragi Malt

When the body needs a break from caffeinated drinks like coffee and tea, Ragi Malt is the perfect warm beverage.

Posted by Indira©Copyrighted in Amma & Authentic Andhra,Dhanyam (Grains),Jaggery,Milk,Ragi,Ragi Flour (Monday May 2, 2005 at 1:18 pm- permalink)
Comments (76)

The New Home of Mahanandi: www.themahanandi.org