Mahanandi

Living in Consciousness ~ Indi(r)a’s Food and Garden Weblog

Ragi Mudda (Ragi Sankati)

Ragi skipped a generation in popularity. Though our educated parents knew how to make Ragi mudda, they didn’t think of it as a cool recipe for everyday meal. Education and jobs have moved them from villages to cities and old type of recipes was not fashionable to them anymore.

Recently there is a surge of pride in our agricultural products. I call it agricultural patriotism, elicited because, some evil global corporations (US based) which tried to claim patents on turmeric. If they had gotten these patents, no one except the company would have rights on this ancient agricultural product. numerous cases of this kind of attempts to steal the agricultural rights, virtues and history of ancient herbs and products, have surfaced in the recent past. People in countries like India stood steadfast to preserve their rights and they prevailed.

Okay… anyhow coming back to Ragi…
Like quinoa of South American indigenous people, Ragi also plays important part in the nutritional makeup of South India’s village populace. Unpretentious, basic and strength to body kind of food, rich in Calcium and iron, I love my ragi. Low in price, easy to make and versatile, the basic recipe can be adopted to suit any type of palate.

Here is the recipe of ragi mudda or sankati the way we make in our home.
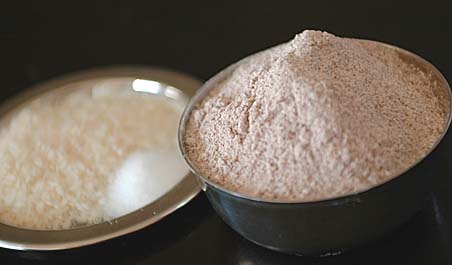
Ragi Flour, Rice and Salt - Ingredeints for Ragi Mudda

Recipe:
(for two people, for one serving)

1 cup of ragi flour
Fistful of rice
1/4 teaspoon of salt
4 cups of water
1 teaspoon of ghee

Preparation:

Take water and rice in a saucepan, add salt and bring to a boil. Cover and cook the rice until the grains are Ragi Mudda - In Final stages of preparationsoft. When the rice is soft, add – just pour or dump ragi flour into the pot. Donot stir now, this is the way folks back at home cook. Cover and put this mixture on medium heat for few minutes until the steam lifts the plate covering the pan. Remove the cover. Using a wooden masher or whisk, stir the ragi-rice mixure vigorously and thoroughly until you see no lumps.
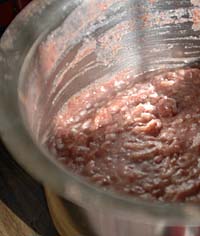
Reduce the heat to low, cover and let it steam cook for about 15 minutes. Switch off the heat. Let it cool down a little bit and make mudda or balls with it. Back home, they dip their hands in cool water first and then immediately take a portion of ragi and shape them into a ball, all done very fast. Here, I use an ice cream scooper to make round balls.

How it is served: Place the ragi mudda in a bowl and pour the sambhar over it. Not too cold and not too hot, just warm is perfect for the palate. Drizzle ghee over it. Today I made carrot sambhar for ragi mudda. It tastes quite good not only with sambhar and but also with peanut chutney, potato kurma or any other vegetable gravy curry. People in Telangana region of Andhra, are particularly fond of ragi mudda/sankati-chicken kurma combination.

How it is eaten: Using your hand or with a spoon, take small portions from the big ragi mudda, dip them into sambhar and swallow. Don’t use teeth; let the tongue do the work. Ragi can be incredibly gummy so traditionally the small balls are never bitten, they are just swallowed. Warm ragi mudda coated all around with sambhar… gives an incredible satisfaction. Children love this kind of food.

Variations: As I mentioned above, you can change the recipe to suit your taste just by changing or adding ingredients. Basic method of preparation is the same, but you can make it mildly sweet by adding jaggery or sugar. Or more rich by substituting the water with milk. You can also add one tablespoon of ghee while still cooking. Also add toasted and finely powdered cashews or peanuts to make it even richer.
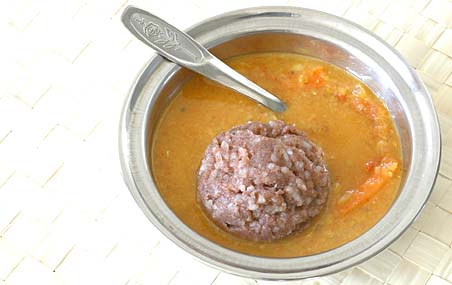
Ragi Mudda (Ragi Porridge / Ragi Sankati) in Carrot Sambhar

Ragi mudda or santaki in Carrot sambhar with ghee ~ Our meal today.

English translation of Ragi Mudda is – Ragi ball or porridge

Recipe Source: Attamma and Rajeswari – My mother in law and sister

Posted by Indira©Copyrighted in Amma & Authentic Andhra,Ragi,Ragi Flour (Wednesday December 7, 2005 at 3:47 pm- permalink)
Comments (57)

The New Home of Mahanandi: www.themahanandi.org

Food Blog Awards

Show your love and nominate your favorite Food Blogs Lovely Kate of Accidental Hedonist is hosting the 2nd annual Food Blog Awards. She is inviting all to participate in nominating your favorite food blogs in different categories. Now through December 16th, you can nominate your favorite food blog site for consideration, after which 5 finalists will be chosen in each category and then another voting will take place, to select the ultimate crowd pleaser in each category.

Just click on a category, and enter you favorite food blog name. Have fun!

Posted by Indira©Copyrighted in Zen (Personal) (Tuesday December 6, 2005 at 2:04 pm- permalink)
Comments (2)

The New Home of Mahanandi: www.themahanandi.org

Murukulu (Janthikalu, Chakli)

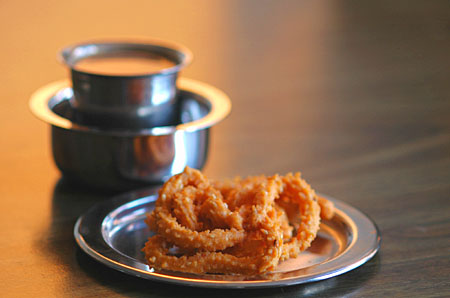
We created our own winter holiday custom; making murukulu, our favorite savory snacks. Vijay’s birthday comes during this month, and he loves murukulu more than anything. So, I make them in large quantity for his b’day and also for us, to snack all throughout the month of December, the traditional holiday season here.

Murukulu and hot tea, South Indian style, under the gorgeous golden rays of wintry Sunset.

Murukulu and Tea, served in a traditional Andhra way, on one fine evening

For the uninitiated, murukulu are India’s snack food. They are made with spiced up rice and lentil flour dough, pressed using a mold into beautiful round coils, then deep-fried in oil. Krum. karum is the sound they make when munched. Indian grocery shops usually carry several varieties of these snacks, try them out first, before trying out the recipe. For who know, love and want to try making murukulu at home, here is the recipe.

Recipe:

2 cups – Rice flour
1/2 cup – Gram flour (Besan)
1/2 cup – Moong flour (Pesara Pindi)

1/4 cup – sesame seeds
1 teaspoon each – cumin and ajwan/vaamu (carom seeds)
1/2 teaspoon each- red chilli powder and salt
Pinch of baking powder

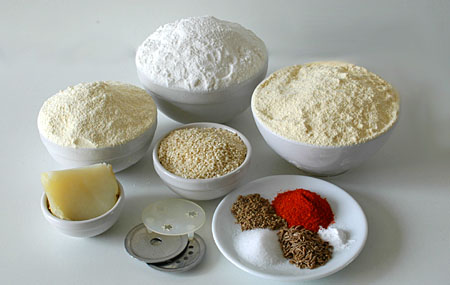
Cooked Potato, Moong flour, Rice flour, Gram flour (besan), sesame seeds, Molds to make different shape murukulu and on the plate Red chilli powder, Ajwan seeds, baking powder, salt and Cumin

Some tips for good quality murukulu:

1. Boiled and Mashed Potato – a tip from my attamma for soft yet crunchy murukulu. One small potato will do for the above measurements. To make the dough more easy to work with, and as emulsifier, she substituted the ghee with the boiled and mashed potato paste. It is a great tip that works.

2. Peanut oil for deep frying – I find it that murukulu tastes great when deep-fried in peanut oil. I tried canola, corn oil… They go rancid only after 15 minutes on high heat and murukulu also taste almost bitter.

Muruku maker with discs – You can buy it in almost all major Indian grocery/appliance shops here in US, or you can try online stores. Cookie press like Sawa or Cookie guns are also good for muruku making.

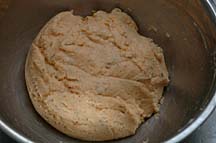
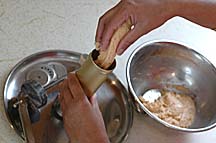
Prepared dough for murukulu making cylinder shaped log with the dough and dropping it into the muruku maker

Preparation:

Sieve and mix together the flours. Add the sesame seeds, pureed potato paste, red chilli powder, baking powder, salt, cumin and ajwan seeds. Make a soft dough by adding the water gradually. Dough shouldn’t be too stiff. Take small portion of dough and make a cylindrical shaped log and drop it into the muruku mold, like shown in the photo above.

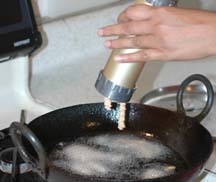
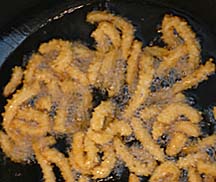
Pressing the dough into muruku shape using muruku maker into hot oil Making of Murukulu- after 5 minutes in hot oil

Deep Frying:

In a wok like deep, sturdy vessel, heat the peanut oil to hot. With your hands, press the muruku mold over the hot oil, making concentric circles, so that the coils of dough come out and drop into the hot oil in circle shape. When you are practiced at making them, you can get two to three circles of dough coils, successfully. My level of expertise at making these beautiful circles is a hit and miss. Anyway you make them, they will turn out, one tasty, crunchy snack, so don’t stress out too much about circles and technique, I don’t.

Fry both sides till golden, and then remove. It takes approximately 5 minutes to fry one batch. Repeat till all the dough is used. Let them cool and store in an airtight container.

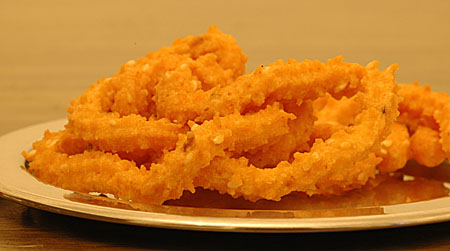
During frying, always keep the stove heat on very high. Just by changing the discs, one can make several different shaped murukulu. Shammi of Food in the Main, made recently ribbon shaped muruku for Diwali. I usually use medium round holes disc and star shaped holes disc. The ones photographed here are made using the star shaped holes disc.

Golden Murukulu - Photo taken in evening Sun light
A plate of Murukulu

Recipe Source: Attamma (MIL)

Posted by Indira©Copyrighted in Amma & Authentic Andhra,Gram Flour (Besan),Moong Flour,Rice Flour,Sesame Seeds (Monday December 5, 2005 at 2:28 am- permalink)
Comments (53)

The New Home of Mahanandi: www.themahanandi.org

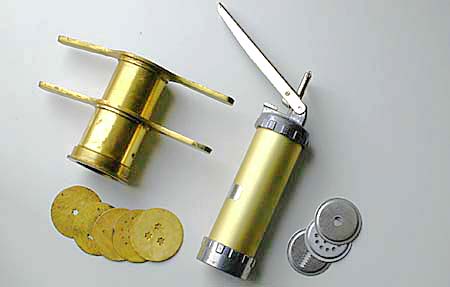
Muruku Maker

For this week Indian Kitchen , my project of creating online Indian glossary in images:

Bronze murukulu maker from India and Sawa 2000 Cookie press from Sweden – I use both to make murukulu(murukku) in different patterns and shapes.

Bronze muruku maker is available in Indian appliance shops here in US. Sawa cookie press, try Ebay or one of those kitchen gadget selling shops.

Murukula Maker

Posted by Indira©Copyrighted in Indian Kitchen,Indian Utensils (Sunday December 4, 2005 at 7:24 pm- permalink)
Comments (18)

The New Home of Mahanandi: www.themahanandi.org

Televison Debut

Our small town is making television debut on ABC channel, today. Do you remember my post about ABC’s Extreme Makeover- Home Edition. Today at 8/7 central time, they are going to show the episode filmed in our town, featuring Novak family.

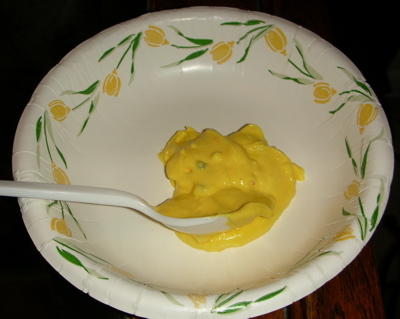
Photo from Lulu Loves Manhattan food blogWhat is this food item? Guessing game, now with prizes for correct guessers – all courtesy of Lulu of Lulu Loves Manhattan.
Go visit and have fun.
Photo from Lulu Loves Manhattan

Posted by Indira©Copyrighted in Zen (Personal) (Sunday December 4, 2005 at 3:07 pm- permalink)
Comments (5)

The New Home of Mahanandi: www.themahanandi.org

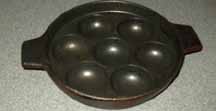
Coocnut Scraper & Kuzhi Paniyaram

Swarna from Chennai, sent me via email, these two beautiful images of her kitchen gadgets for my Indian Kitchen series.

She wrote to me…
“Both of these given to me by my mother from Madras. The first one is a hand held coconut grater or scraper would be more apt and the second one is what we call “kuzhi paniyaram” vessel. Kuzhi means hole (literally) in tamil and paniyaram I suppose is the name of the dish. It can be made sweet or savoury. mostly we do the left over idli/dosa batter, chop a few onions, green chillies do the tadka and pour the batter into these moulds. The types of batter we can do is endless really, rava(sooji) combination, maida/jaggery/mashed banana- for a sweet paniyaram.”

Hand Held Coconut Scraper Used for grating the fresh coconut - Sent by  Swarna, reader of this blog,  from UK kuzhi paniyaram or Ponganaala Pennam - Sent by Swarna, a reader of this blog, from UK
Hand held coconut scraper/grater and Kuzhi Paniyaram (Ponganaala Pennam)

Thanks Swarna!

Posted by Indira©Copyrighted in Indian Kitchen,Indian Utensils (Sunday December 4, 2005 at 1:52 am- permalink)
Comments (7)

The New Home of Mahanandi: www.themahanandi.org

Weekend Cat Blogging

Kittaya

Kittaya

Checkout Kiri and all cute kitties of food blogging world at Clare’s blog.

Posted by Indira©Copyrighted in Kittaya,Zen (Personal) (Saturday December 3, 2005 at 2:35 pm- permalink)
Comments (9)

The New Home of Mahanandi: www.themahanandi.org

Onion Chutney (Ulli Gadda Pacchadi)

This onion chutney is very popular in North Karnataka and also in our Raayala Seema region. Rural in origin and a favorite of hard working people and farmers, this chunky, saucy, sort-of-sweet, sort-of-spicy chutney tastes terrific with rotis, both wheat and jowar and also with rice.

Recipe:
(for two, for one serving)

1 tablespoon peanut oil
1 big red onion – cut to big chunks
5 dried red chillies
1 tablespoon grated coconut (fresh or dried)
Small piece of jaggery – powdered (sugar won’t work in this recipe)
Cherry tomato sized tamarind – Presoaked in very little water (one tablespoon is plenty) for about 15 minutes, so that it can grind well.
Salt to taste

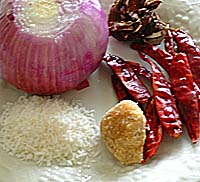
Onion is the main ingredient in this chutney; so don’t skimp on the onion. If you have small onions, use two or three, and red onions or shallots are the best for this recipe. At Nandyala, we make it with erra gaddalu (shallots here).

Red Onion, Coconut Powder, Jaggery, Red Chillies and Tamarind - Ingredients for Onion Chutney

Place an iron skillet on stove-top. Add oil, swirl to coat the pan. When the oil reaches smoking point, add chunks of onion. Saute them to soft brown on high heat stirring frequently. Remove them to a plate, then add the dried red chillies. Saute them to brown. Remove to a plate. Allow them to cool to room temperature. Texturewise and tastewise, this is important. Go, sit down and wait.

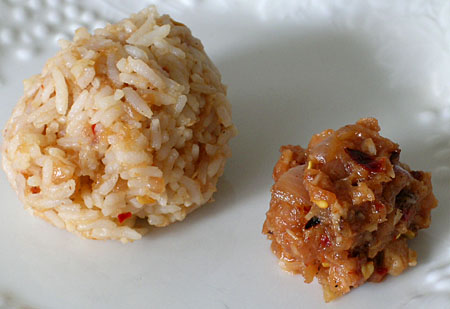
When they are cool enough to touch, take the red chillies, coconut, jaggery, tamarind and salt in a mortar or in a food processor. Pound or blenduntil the red chillies are smooth. Then add the onion pieces. Pulse few times to coarse consistency. Do not puree the onions, we do not want that. They should be coarsely crushed like shown in the image below. Stone mortar really comes to a great use for this kind of recipe and I made this chutney in a stone mortar for todays meal.

Remove to a cup and serve with rice or chapati and dal.

Onion Chutney, Red Onion Chutney (Ulli gadda Pacchadi)
Red Onion Chutney and Sona Masuri Rice mixed with Chutney ~ Meal Today

Posted by Indira©Copyrighted in Amma & Authentic Andhra,Jaggery,Onions (Thursday December 1, 2005 at 7:42 pm- permalink)
Comments (20)

The New Home of Mahanandi: www.themahanandi.org

« Next Page