Mahanandi

Living in Consciousness ~ Indi(r)a’s Food and Garden Weblog

Colorful Idly with Carrots & Chana Dal

Back home, a breakfast is still a breakfast. It is not brunch, lunch or supper. Breakfast items are few, and everyday one of them is prepared and eaten by 9 AM. My mother never uttered the words – “I’m not feeling well today and not making any breakfast for you”. As a grown up, living in a silent world with plenty of time to reflect back, now I realise, my mother like me, must had several reasons to slack off, if she wanted to. But she never did. I am sure many of you can relate to what I am talking about. That kind of devotion was given to us when we were children. This is the reason why I often mention ‘amma (mother)’ as recipe source. If I have the courtesy to write a cookbook author’s name as recipe source for a blogged recipe, why shouldn’t I return the same courtesy to amma, from whom I learned most of my cooking from.

Colorful idly with carrots and chana dal aka masala idly is one of her recipes. Finely grated carrots and chana dal along with green chillies and cumin etc. are added to the leftover idly batter for a next day morning breakfast. Imagine the taste of upma, and these idlies almost taste like that. Steam cooked in round shape, they are a pleasure when served hot with chutney and sambar. Though they are a breakfast item back home, here I often make them on a weekend for brunch, lunch or for supper.

Idly plates filled with idly batter - ready for steaming

Recipe:
This is same as idly preparation except that we add bunch of other ingredients and change the lilly white, cloud like plain idlies into colorful, somewhat dense masala idlies.

(for 16 idlies)
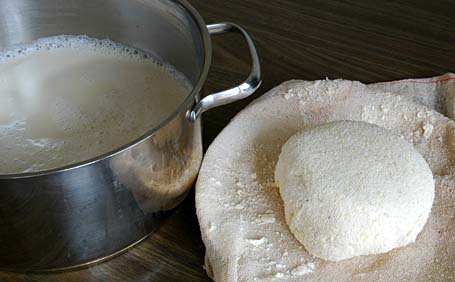
3 cups of Idly batter
(urad dal and rice ravva(cream of rice) in 1:2 ratio, soaked, grind into smooth batter and kept overnight for fermentation)
Ingredients to add to idly batter
1 cup of grated carrot (1 big carrot)
¼ cup of chana dal (soaked in water for atleast an hour)
¼ cup of coarsely crushed, roasted peanuts or cashews
¼ cup of finely chopped cilantro
2 to 4 finely chopped or minced green chillies
1 teaspoon of cumin and few curry leaves
¼ teaspoon of salt or to taste

Mix the ingredients with idly batter thoroughly. Fill the round impressions of idly plates with this batter. Place the idly stand in an idly cooker and steam cook them for about 20 minutes or until the batter sets completely. Remove the idly stand from the cooker, run a spoon under each impression and separate the cooked idlies from the impressions. Serve them hot with peanut or coconut chutney and sambhar.

Idlies with veggies, served with peanut chutney, and shallot sambhar
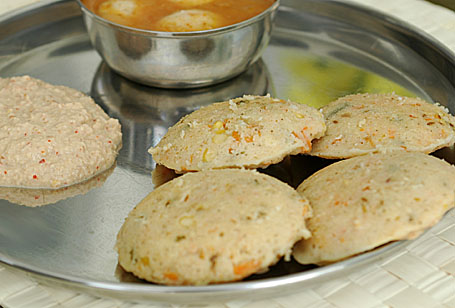
Masala idlies with peanut chutney and shallot sambhar

For more detailed recipe of idly, about idly stand, idly plates and idly cooker etc., – click here

Posted by Indira©Copyrighted in Carrots,Chana Dal,Rice Ravva (Cream of Rice),Urad Dal (Washed) (Tuesday April 11, 2006 at 1:54 pm- permalink)
Comments (25)

The New Home of Mahanandi: www.themahanandi.org

Burger and Fries ~ The Sweet Kind

We’ve received some unexpected guests yesterday and I had to prepare a quick appetizer/sweet. My guests are very Indian but their ‘chic’ children absolutely don’t like anything remotely Indian, that is what the parents informed us. So with the gifts they brought and with some things we purchased from the shop, I put together a quick appetizer/dessert mainly for children. There is no excuse to feed them this kind of stuff but that was all I’m able to comeup with and they seem to like my burger and french fries imitation.

I also prepared mango shakes to go with burger and french fries. My American fast food simulation seem to really impress the parents and their equally gullible children. After they left, I couldn’t refrain from temptation any longer, so I prepared this special burger for myself. First I took a photo and then I took a bite. The burger-fries are rich in calories and super rich in taste – the whole combination felt sinful, with all the chocolate, strawberry and mango flavors included. Imagine the taste if I had used the glazed donuts, instead of plain ones! It is a dare, any one?

Burger and Fries - The Sweet Kind

Shopping List & How to:
For Burgers: Donuts, glaze free(bun), brownies(patty), white chocolate(cheese).
Slice the donuts into half. Cut brownies into thin layers. Size the chocolate to match the size of cut brownie. Put together a sweet burger.
For ketchup:
Puree strawberries, orange juice and some honey for ketchup.
For french fries:
Peel the mango and slice the mango into thin french fry shaped pieces

Prerequisites to participate in dare: 4 miles running or walking:).
Recipe idea: Cooking show on TV

This is my entry to “Virtual Cooking Competition~Appetizers“, by VKN of My Dhaba. The gracious host has just announced the prize – 250 dollars, can you believe it?, for the winning entries and requesting your nominations for favorite entries. Go, nominate your favorites and have fun.

Posted by Indira©Copyrighted in Fruits,Mango,Strawberries (Monday April 10, 2006 at 9:59 am- permalink)
Comments (30)

The New Home of Mahanandi: www.themahanandi.org

Sorghum Roti (Jonna Rotte, Jowar Roti)

 Jonna rotte with curry (Sorghum roti with curry)

Very popular in villages and small towns as an accompaniment to meat and vegetable gravy curries, sorghum roti is one of the traditional recipes of India. As the name suggests, the rotis are prepared from sorghum flour. Instead of rolling pin, hands are used to shape the sorghum dough into a round, flat, thin circle. Because sorghum flour is gluten-free flour, it’s very tough to spread the dough without breaking the shape, and one really needs hands-on experience and many failed attempts to get the skill.

I am very sad to say that it is becoming one of those ‘dying’ kind of recipes. My mother and grandmother generations perfected the sorghum roti preparation. But coming to my generation, the ‘educated’, the ‘sophisticated’ ones, who can talk about baguettes and brie’s for hours and goes to great lengths to prepare and showoff knowledge of foreign cuisines, have no interest and can’t give the time of the day to learn or master the technique of this classic Indian recipe. It is not that we don’t like the taste. We love it! Imagine the warm paratha taste, multiply by 10 times, that’s how a good, well made sorghum roti tastes. In artisan hands, it puffs like puri – all on its own. No leavening agents and oil or ghee are added. Just fresh sorghum flour, warm water and touch of fire – pure grain power in its glory.

Making a prefect sorghum roti is a skill that I wanted to master with all my heart. For me, it is not just a recipe, but an Indian tradition that I wished to be a part of. The process is difficult to explain in written words and pretty much useless. Again this is one of those recipes, where one must be in the kitchen next to the cook, to know what they are talking about. One really needs a visual experience to understand the recipe. Well that’s how I feel anyway, so I’m going to keep the recipe directions simple for a change, and instead show the process in images.

Spreading the dough into thin round shape using hands

Prepare dough by gradually adding and mixing hot water. After a rest period of 10 to 15 minutes, the dough is kneaded and divided into lemon sized balls. Then, using palm of the right hand, on a flat board, the dough is spread into flat, thin round.

Cooking the roti

The doughspread is carefully lifted and placed on a hot iron tava (griddle). We use a separate tava just for making these rotis. On medium-high heat, roti is roasted slowly. Water is applied with a cotton cloth on the surface of roti, before turning it to the other side.

Roti is turned to otherside

After two to three minutes of cooking, roti is turned to the other side and cooked until done.


Sorghum roti (Jonna Rotte, Jowar roti) with curry
Jonna Rotte (Sorghum Roti) with curry ~ our meal today.

Recipe origin and source: Rayalaseema(Andhra, India) and Amma.

Posted by Indira©Copyrighted in Amma & Authentic Andhra,Bajri/Jowar Flour,Jowar (Jonnalu),Millet (Tuesday April 4, 2006 at 10:49 pm- permalink)
Comments (72)

The New Home of Mahanandi: www.themahanandi.org

Home Made Soymilk

Homemade Soya Milk

I was looking for recipes to prepare soymilk at home for a while now. The reason ofcourse is the recent pricehike of commercial soymilk. In big warehouse shops like Costco, the price for 3 packets of ‘Silk’ brand soymilk was 4 dollars, few years ago. It is now around 8 dollars. Vijay and I, we both like soymilk – for cereal, for cooking and whenever we feel like drinking something refreshing particularly during summer months. Cold soymilk has been our drink of choice. But now with the recent price increases, I’ve been feeling little reluctant to pay that kind of price, it felt like ‘organic’ kind of ripoff.

That’s when I found this clearly described recipe at fellow foodblogger/chef’s blog “Tasty Bytes” for home made soymilk. I had to give it a try. I brought some books from the library and also googled; what I found out was there are mainly two ways to prepare soymilk.

1.Soybeans are soaked, cooked first & then pureed to extract the milk.
2.Soybeans are soaked, pureed first to extract the milk& then the milk is boiled. (This method is traditional Japanese way of preparing soymilk according to this book.)

I was pendulating which method to follow, because this is my first time preparing at home and I wanted it to be a success taste wise. Well, I left it for Vijay and he chose the second method – Puree, extract and then boil. So last weekend, for the first time, we prepared homemade soymilk. I could not believe how easy it was. The whole thing of extracting the milk took about 30 minutes, that’s all.

What about the taste – we added vanilla and honey for flavoring and tasted the chilled soy milk. It has a strong, more robust flavor than the commercial vanilla soymilk. Not off-putting at all, but again we are motivated to like it :). Adding vanilla and honey was a good choice, because we are accustomed to vanilla flavored, mildly sweet commercial (Silk brand) soymilk. For those of you who ask, why soymilk, what’s so special about it? – We prefer it mainly because it’s a guilt free, hormone and cholesterol free choice we have available here. And soymilk is high in protein and rich in iron but low in sodium, fat and calcium. Also we like it for taste… heavy textured but it has a smooth, silky taste.

Dry Soya Beans, Soaked Soya Beans, Rubbed and skins removed Soya beans
Soybeans – Dry, Soaked, Rubbed and skins removed

Recipe:

2 cups of dried soybeans
4 glasses water
2 tablespoons to ¼ cup of honey(or sweetener of your choice)
1 teaspoon of pure vanilla
Big pot and cheesecloth (gangi gudda/cotton cloth)

Preparation is real simple and 3 steps.
(1) Soak and rub (2) Blend and extract (3) Boil and chill.

Soak and Rub:
Soak the beans overnight in lot of water. They expand considerably, so take a big vessel and add at least two to three glasses of water for them to soak. By Morning, they will double in size. Rub soybeans with hands to remove the outer covering. The flimsy outer covering will easily separate from the beans and will float to the top. With hand, scoop them and remove. Repeat like this, two or three times to remove the covering. I was able to remove the outer layer for at least 75 percent of Soya beans.

Extracted soymilk and the squeezed out bean pulp
Extracted soymilk and the squeezed out soybean pulp

Blend and Extract:
Pour the beans into a colander to drain the water. Take the beans in a blender and in batches, grind them into smooth puree adding water.

Keep a big pot on the side. Cover it with a cheesecloth or gangi gudda/cotton cloth. Pour the pureed bean mixture into the cloth. Pull the cloth together and twist and allow dripping for few minutes. And then with your hands gently squeeze as much milk as possible. Take care not to squeeze the soya bean pulp.

Do this in batches. I kept the squeezed out soya bean pulp from each batch on a plate. Finally I blended this pulp again two times, adding water, to extract as much soymilk as possible.

Boil and Chill:
Pour the milk through a fine sieve into a big pot. You see white foam (the kind, that forms when you blend urad dal or moong dal) floating on the top of milk. Scoop it with a spoon or with your hand. I did this to clear the surface of milk.

Bring the milk to a boil. Add honey and vanilla. Reduce the heat to medium. Partially covered, simmer it for about 30 minutes, stirring in-between. Just like cows milk, layers of skin (meegada) were forming on top, I removed the skin (meegada) layers to a cup and later added this meegada to the ‘aloo chole’ I was preparing for supper. The meegada skins tasted melting delicious.

Allow the milk to cool to room temperature. Pour into a clean bottle and keep the bottles in the refrigerator to chill. Serve and enjoy.

Homemade Soya Milk
Home made soymilk – all ready for chilling in the refrigerator.


Caution: Extremely acquired taste.
Recipe Source: Foodblog – Tasty Bytes and Cookbook – “The science and lore of the Kitchen
Yield: 1 liter (quart) or two bottles like in the photo above.

Posted by Indira©Copyrighted in Soy (Tofu, Yuba) (Monday April 3, 2006 at 12:42 pm- permalink)
Comments (72)

The New Home of Mahanandi: www.themahanandi.org

Weekend Reading – Our School

Swami Vivekananda Vidyalaya

Some invest their money in stock market; we invested ours in our hometown. The school we built with the help of our family back in Nandyala, successfully completed 3 years this April. It’s a high risk, conscious kind of investment, mainly because no one in our family is in the education field until now and our goal is not geared towards profits.

Vijay and his equally talented brother Kiran, worked hard for the last three years, everyday. They designed the building, playground and education curriculum to create a good, quality environment for the children to learn. We started the school first with preschool – LKG, UKG, First class and then every year we are increasing the class to next level. Now we have upto third class. We have big plans for our school and ideas about what it should represent. The kind of education and adults it will create in future. This project is our labor of love and our passion.

This is one of the photos we took last year during our visit to school in Nandyala. Here, the children are all gathered for a school photo. Adorable and pretty innocent, healthy and full of energy – we were like them thirty years ago.

Swami Vivekananda Vidyalaya - School Children

More about our school project at – Nandyala.org.

Posted by Indira©Copyrighted in Zen (Personal) (Sunday April 2, 2006 at 8:52 pm- permalink)
Comments (29)

The New Home of Mahanandi: www.themahanandi.org

Weekend Cat Blogging

Playing Kittaya:

Kittaya

Checkout all the other kitties of food blogging world and cute Kiri in turtle woolwear at Clare’s ‘Eat Stuff’.

Posted by Indira©Copyrighted in Zen (Personal) (Saturday April 1, 2006 at 10:10 pm- permalink)
Comments (8)

The New Home of Mahanandi: www.themahanandi.org

« Next Page