Mahanandi

Living in Consciousness ~ Indi(r)a’s Food and Garden Weblog

Flavors of Life ~ Grandmas, Dosas and More

Grandmother, Dosas and More ~ Painting by Sree
Grandmothers, Dosas and More ~ for Dosa Mela
Painting by Sree (5″x6″, Graphite Sketch)

That is not my grandmother. It is just a sketch I made while getting bored on the train, on my journey home from Bangalore. I miss so many things post-marriage. One of them is my grandmother and the old kitchen at my mom’s place where I spent most of my childhood. It looked exactly like this and my grandma would sit exactly like this cooking at her small stove making hot dosas and chapatis and more. She would always mix food in the most delectable combination with chutneys, pickles…. yum! I think those tasted better than anything available in any restaurant. She is now bedridden and can hardly walk and the kitchen is now converted into a modern one. I think if I build my own house, I would want an old- fashioned kitchen just like my grandmother’s.:)

~ Sree

Flavors of Life: Introduction
Flavors of Life, Previously:

Banana Vendor by Sree Pumpkin Blossom by Sree Cotton Candy Painting by Sree Infinitea by Sree
Tirupathi Laddus by Sree

Posted by Indira©Copyrighted in Indian Kitchen,Sree,Traditions (Saturday March 29, 2008 at 1:00 am- permalink)
Comments (20)

The New Home of Mahanandi: www.themahanandi.org

Gram Flour Dosa (Besan Ka Cheela or Puda)

I like food items prepared with gram flour. Golden yellow colored flour not only tastes mildly sweet, it’s also gluten free and famously known for its anti-diabetic properties.

Other Bharatiya names for gram flour are – Besan (in Hindi), Sanaga Pindi (in Telugu) and Kadalai Maavu (in Tamil).

After bajjis and pakoras, my next favorite item with besan is dosas. Besan Dosa is a traditional Indian breakfast and evening snack item, prepared by mixing gram flour with a variety of finely chopped vegetables. The dosas are usually served with chutney and raita. They are quite easy to prepare and we can experiment with ingredient quantities quite liberally without any dire consequences.

Recipe:
For about 8 to 10 small size dosas

2 cups of gram flour (besan)
1 big onion, 6 green chillies, few sprigs of cilantro – finely chopped
1 big carrot – finely grated
1 tsp of each – cumin and ajwan (vaamu/carom seeds)
½ tsp of salt or to taste

Sift gram flour to aerate and to remove lumps. Take in a big vessel. First add cumin, ajwan, and salt. Mix to combine. Next, add the finely chopped vegetables. By gradually adding water, about 1 to 2 cups, mix and prepare besan batter to a medium-thick pouring consistency, like idly batter.

Heat an iron dosa pan and grease it with half-cut whole onion. When the pan is hot, pour ladleful of batter and spread into thin round. Sprinkle half teaspoon of oil or ghee on the top. Wait for bubbles to appear. When the underside starts to brown, gently lift and turn to other side. Cook the dosa until the second side is lightly browned. Remove and serve hot with chutney. (They are not that good when they get cold, so prepare them just before mealtime.)

Besan Dosa with Red Bell Pepper Chutney
Besan Dosas, Red Bell Pepper Chutney with Coriander Flower Garnish ~ Our Simple Lunch Today

More About Besan Dosa:
Video blogging of Puda by Jay Dave and Sisters (entertaining)
Kay’s Besan Cheela
Italian Version-Socca from Tasty Bytes

Posted by Indira©Copyrighted in Gram Flour (Besan) (Monday June 19, 2006 at 3:32 pm- permalink)
Comments (29)

The New Home of Mahanandi: www.themahanandi.org

Wheat Flour Dosa (Godhuma Dosa)

Goduma Dosa with Peanut Chutney
Wheat flour dosa (Godhuma Dosa) with Peanut Chutney

Easy, breezy and lacy – that’s how I’d describe wheat flour dosa. I prepare this traditional, lace like, instant dosa when I am low in appetite, ya that happens sometimes, or short on time, aren’t we always?

Recipe is really simple. Mix a cup of wheat flour (atta/chapati flour) with 2 to 3 cups of water. Stir in a teaspoon of black pepper powder and salt. Thoroughly mix the batter without any lumps. The consistency of batter must be like thick buttermilk, not too watery or not too tight. Don’t let the batter sit for long time, it will become gooey mass, and resulting dosas won’t be pretty.

To prepare dosas, lightly oil the dosa tava and rub it with a cut onion. Heat over medium-high. When the tava is hot, pour a ladleful of batter steadily from a height of 3 to 5 inches onto the tava. Allow it spread on its own in a thin lace like layer. Because wheat flour batter is very sticky, trying to shape the dosa with back of the spoon like we do for regular dosa won’t work. Please resist the temptation to shape and allow it to spread on its own. Sprinkle a half teaspoon of ghee or peanut oil and on high heat, cook. Within a minute or two, bubbles start to appear on the surface. Wait until the underside of dosa turns golden and then gently turn it to the other side. Cook for another minute or two. Remove and serve hot with peanut or coconut chutney.

Wheat flour batter spead thin in a lace like fashion on hot tava. Bubbles are appearing.
Wheat flour batter spread in a thin lace like fashion

 Turning to the other side to cook

Folding it into half to remove the dosa
With 4 plate-sized dosas like these, expect to get stuffed royally.

Posted by Indira©Copyrighted in Amma & Authentic Andhra,Wheat Flour (Durum Atta) (Tuesday April 18, 2006 at 3:24 pm- permalink)
Comments (44)

The New Home of Mahanandi: www.themahanandi.org

Masala Dosa

Masala Dosa with Coconut chutney and a cup of sambhar
Masala dosa with coconut chutney and a cup of shallot and carrot sambhar

How can anyone not like dosas? Just one bite, that’s all it takes to fall in love with them. They are such a knockout mini meal any time of the day. I often dream of starting my own franchise here, 🙂 to cater freshly cooked dosas with all kinds of filling inside them. There is one already in New York, New Jersey area, called ‘Dosa Express’, which boasts about 50 different types of dosas – all kinds, from just plain dosa to dosas with variety of fillings, like cheese-potato curry combo etc.,

But if you ask me, nothing can beat the old classic, ‘Masala Dosa’. Crisp dosas filled with spicy powders, onion-red chilli paste and potato curry, if that’s not enough they are served with coconut chutney and a cup of sambhar. Can’t stand on your feet kind of knockout combo. Preparing this type of restaurant dosa at home is really easy, only thing you need is time and some planning.

Recipe:

A thick bottomed, flat, seasoned cast-iron pan
1 cup of rice
½ cup urad dal

Wash and soak rice and dal together in 2 to 3 cups of water for at least 6 hours. Drain and grind them in a blender or wet grinder into a smooth batter. Add little water in-between for smooth grinding, if necessary. The consistency of batter must be like that of evaporated milk (commercial kind). Not too watery or not too thick.

Pour the batter into a big vessel, cover it with a lid and keep it in a warm place for overnight fermentation. By morning the batter will be doubled, usually. Add half teaspoon of salt to the batter and stir thoroughly and the batter is ready for dosas. Place and heat the dosa skillet on the stove and follow the procedure shown in the pictures below.


Season the Dosa skillet with a teaspoon of oil and rub it with a cut onion. Onion not only gives nice flavor to dosa, also seasons the skillet.(this is an oldtime tip)


Pour a ladleful of batter on the skillet. Spread it around with the ladle.


With the ladle, shape and move the batter outwards in concentric circles – until it shapes in a circular, thin round. Sprinkle half teaspoon of peanut oil around the batter. Increase the heat high and cook it for few minutes.


Flip it to other side to cook for few seconds.


Reverse it again and quickly sprinkle some pappula podi(spicy dalia powder), apply red onion-dried red chilli paste around the dosa and then place a general portion of potato curry in the middle.


Fold the dosa in middle, remove and serve it immediately. This whole process must be done in maximum two to three minutes. Hot skillet and fast hand action is necessary and do not keep dosa on skillet for long, it’ll turnout hard and brittle, instead of soft and chewy.

Masala Dosa with Coconut chutney and a cup of sambhar
Masala dosa with coconut chutney & a cup of sambhar ~ Our weekend brunch

Prepared in a style of Udipi restaurant dosa, Nandyala, India.
Potato Curry: Pressure cook/boil potaotoes until tender. Remove the skin, cut or crumble them into bite-sized pieces. Saut̩ finely chopped onions, green chillies and crumbled potatoes together. Season to taste Рpotato curry for dosa is ready.
Onion -red chilli paste: Cut one big red onion or 4 to 6 shallots into chunks. Add 6 dried red chillies and quarter teaspoon of salt or to taste, and grind into coarse mixture.
Pappula podi – recipe.
Coconut chutney – recipe.
Sambhar – recipe.

Posted by Indira©Copyrighted in Amma & Authentic Andhra,Sona Masuri Rice,Urad Dal (Washed) (Tuesday March 21, 2006 at 4:53 pm- permalink)
Comments (69)

The New Home of Mahanandi: www.themahanandi.org

Traditional Indian Iron Flat Pans and Skillet (To Cook Chapati, Roti, Dosa & Ponganalu)

For this week’s “Indian Kitchen” and in response to requests about my cast iron cookware – here are some my very well seasoned cast iron flat pans and skillet that I use regularly and specifically to prepare chapatis, sorghum roti, dosa and ponganalu.

Chapati pennam
Traditional iron pan with thin bottom to prepare chapatis(parathas, wheat rotis) – brought it from Nandyala (my hometown in India).

Roti Pennam to prepare Sorghum Roti
Traditional iron pan with round bottom to prepare Jonna rotte(Sorghum roti) – Brought it from Nandyala

Dosa Pennam
Thick bottomed, flat cast iron pan to prepare dosa, utappam, pesarattu etc – bought this at ‘Target’.

Ponganala Pennam
Traditional iron skillet with round impressions to hold the batter, to cook a South Indian breakfast called “ponganalu” – brought it from Nandyala.

Posted by Indira©Copyrighted in Amma & Authentic Andhra,Indian Kitchen,Indian Utensils (Sunday March 19, 2006 at 3:24 pm- permalink)
Comments (67)

The New Home of Mahanandi: www.themahanandi.org

Ragi Dosa & Orange-Banana Smoothie

After 3 days of heavy meals because of Deepavali, I wanted to try something new, easy to make and somewhat light on stomach kind of meal. Two of VKN’s, My Dhaba recipes – Ragi Dosa and Orange-banana yogurt&honey drink (HOBIY) have caught my eye.

I have all the ingredients including fresh coconut (puja offering) and oranges. So I tried out these two recipes today for lunch and they turned out spectacular tastewise.

I Loved the chewy taste of ragi dosa and the smell is incredible; it’s like the smell of earth when it is raining. I had the fresh ragi flour, perhaps that may be the reason for the incredible aroma.
(You can find ragi flour in almost all Indian grocery shops here in US. Ragi (finger millet) is one of the ancient grains and very healthy source of Calcium. )

Ragi Flour, Onion, Green Chilli, Fresh Coconut and Cilantro - Ingredients for Ragi Dosa or Utappam

Recipe:

3 cups a href=”http://www.patelbrothersusa.com/show_item_details.asp?item_id=163″>ragi flour
1 cup coconut- fresh and finely grated
Onions, green chillies and cilantro – finely chopped, to taste
Salt to taste

I mixed all of the above ingredients with water in a bowl, thoroughly (like dosa/pancake batter consistency) and poured ladleful of batter onto a hot griddle. Adding few drops of oil, cooked the dosa on both sides till brown and crispy. I made four of these dosas (utappams). We had them with coconut chutney.

I also made the HOBIY. When I first read about this drink, I was little bit skeptical. First of all it’s orange and banana, then it’s yogurt. I wondered about the combination. Vijay often makes himself a drink with soya milk, banana and honey. Thinking, he may like this new drink, I prepared the VKN’s signatory HOBIY drink, by blending half cup of home made yogurt, freshly squeezed juice of one naval orange, one small banana and two tablespoons of honey and few ice cubes. Again, turned out to be one refreshing drink. There was no overpowering smell of banana. Orange juice and yogurt completely masked the smell and taste of banana. I, who normally don’t like the taste of banana in drink form, also enjoyed it.

Ragi Dosa, Coconut Chutney and Banana-Orange Yogurt Drink
Our meal today ~ Ragi Dosa with Coconut Chutney and Banana-Orange Yogurt Smoothie.

Thanks VKN for sharing these two wonderful, traditional, tasty family recipes with us.

Posted by Indira©Copyrighted in Bananas,Flour(Pindi),Green Chillies,Ragi,Ragi Flour (Thursday November 3, 2005 at 5:20 pm- permalink)
Comments (23)

The New Home of Mahanandi: www.themahanandi.org

Sprouted Moong Dal Dosa

I like dosas of all kinds, when Mika posted a dosa recipe with sprouted moong dal, I knew I had to try it. At least once a month, I do the whole, three day, moong dal sprouting thing – meaning- soaking moong dal overnight in water, next morning draining the water from the soaked moong dal and hanging them in a wet cheesecloth (aka-clean cotton cloth with tiny wholes) by the kitchen window. Because of hot weather these days, the moong dal loses the moisture quickly so you have to wet the cloth frequently. By the next day, there you have it- sprouted moong dal. What’s more beautiful than sprouted beans, with their tiny white sprouts protruding.

Sprouted Moong Dal(Mung Beans)

Most of the times, we saute them lightly, sprinkle some salt, instead of popcorn etc., we munch on them. Sometimes we do the whole onion, coconut, green chilli, saute in oil thing. Now by trying this recipe, we found another great way to consume sprouted moong dal.

I mostly followed Mika’s recipe, grinded the sprouts adding ginger, chillies and salt. Then, to grinded mixture I also added cumin seeds, half cup of water, finely chopped onions and cilantro. Mixed all the ingredients thoroughly and prepared the dosas. They are more like utappam version of pesarattus, thicker and more tastier because I used sprouted moong dal.

Sprouted Moong Dal Dosa

Served with coconut-cilantro chutney, we couldn’t get enough of them. These gave us great satisfying taste with minimal effort. Thanks to Mika for a great recipe.

Posted by Indira©Copyrighted in Moong Dal (whole),Onions,Sprouts (Molakalu) (Sunday June 12, 2005 at 5:16 pm- permalink)
Comments (19)

The New Home of Mahanandi: www.themahanandi.org

Pesarattu (Moong Dal Dosa)

Pesarattu (dosa) prepared with moong dal, is the signatory breakfast of our region(Andhra Pradesh) in India. Done to golden perfection, sprinkled with chopped onions inside, served traditionally with coconut, ginger chutneys and sambhar, have 2 or 3 pesarattus for breakfast, you will be in a food induced delirious haze all day. Type of breakfast that should be prepared on a weekend and particularly enjoyful when prepared by others, and the only thing one has to do is sit, eat and praise the cook liberally for their generous ‘annapoorna‘ heart.

Recipe:

Soak 3 cups of split moong dal in water overnight (Friday night) for about 10 to 12 pesarattus. Next on Saturday morning like 10 or 11 o clock (don’t tell me that you’d enter the kitchen on a weekend earlier than that), drain water, grind the dal along with 5 to 6 green chillies, small piece of ginger and 1 tsp of salt into fine paste of medium consistency. Remove the batter, add about a teaspoon of cumin seeds and mix the batter thoroughly.

Split moong dal - Soaked in water - Grind to paste

Heat a cast iron flat pan, add 2 tsp of oil, spread it with an onion (remove the the top). This is to season the pan so that the pesarattu will comes off easily without sticking to the pan. The pan must be hot for pesarattu to come out in good shape. If you sprinkle water on the pan, it must sizzle.

Pour one ladle full of batter into the center of pan and spread it around in a circular fashion (from inside out) shaping the batter into a thin round.

ladle full of batter Spreading the batter in a round big circle

Pesarattu1 waiting for the other side to fry

Wait few seconds and sprinkle 1 tsp of oil or ghee on top and around the edges of pesarattu.

Wait for few minutes untill the bottom gets golden, then reverse it, cook the otherside now, for few seconds. Reverse it back, sprinkle finely chopped onions on the top and fold it half. Remove from the pan and serve.

First few attempts may not turn out good but don’t be discouraged. Try again. It takes time but once you get the hang of it, it’s really quite easy to prepare them, just like dosas.

I have prepared peanut chutney instead of traditional coconut and ginger chutneys. So there it is, pesarattu with peanut chutney ~ our weekend breakfast.

Pesarattu with Peanut chutney

Posted by Indira©Copyrighted in Amma & Authentic Andhra,Moong Dal (Split) (Monday May 9, 2005 at 7:31 pm- permalink)
Comments (54)

The New Home of Mahanandi: www.themahanandi.org

Peanut Podi (Palleela Podi)

Flavorful and spicy, peanut podi is a neat alternative to chutneys. Sprinkle few teaspoons of podi on breakfast items like upma, pongal, idly and dosa. Or, apply it on warm chapati or mix with rice. With Peanut podi ready on hand, it is easy to have decent meals during time-starved days. I used to live on jars of peanut podi during college days. Whenever busy days are ahead I make it at home too.

Peanuts, Chilli and Cumin

2 cups shelled peanuts
12- finger length dried red chilli (from Indian grocery)
1-teaspoon cumin
1 teaspoon salt or to taste

Roast peanuts to pale brown color. Cool. Rub to remove peanut skins.
Dry roast red chilli and cumin to fragrance. Cool.

Take peanuts, red chilli and cumin in a Sumeet style mixer or in a food processor. Add salt. Pulse few times to fine sand like consistency. Store the podi in a clean, dry jar. Stays fresh for about at least a month or two.

Sometimes I also add garlic. Tastes excellent but garlic moisture reduces the shelf life of podi to a week.

Peanut Podi
Peanut Podi

From Telugu to English:
Podi = Powder

Posted by Indira©Copyrighted in Amma & Authentic Andhra,Dried Red Chillies,Peanuts (Friday January 2, 2009 at 3:15 pm- permalink)
Comments (31)

The New Home of Mahanandi: www.themahanandi.org

Jihva 08

Peacock Sugar Sculptures

Jihvā, the online food blogging event will be two years old this April. Each month a natural, wholesome ingredient was selected and featured, and during last year over a span of 12 months, a total of about 1500 entries and recipes flew in from across the world. The year started with Green leafy vegetables and moved on to Jackfruit, Brinjal, Mirchi, Rice, Banana, Diwali Treats, Toor Dal, Cocoa/Chocolate, Onions, Lemons/Limes and ended with Garlic goodness. My sincere thanks to the hosts Bee&Jai, Sangeeta, Nandita, Sharmi, Mandira, Vee, Linda, Deepz, Radhika, Coffee and Mathy Kandasamy. Also to all the participants for investing their effort and energy to create such wonderful cookery resource through Jihvā. Great job!

For Jihva year 08, I would like to extend an invitation to fellow bloggers. If you have a natural ingredient that you feel strongly about and would like to highlight it, then this is your chance. Here is more about this event.

What is Jihvā ?
Jihvā, the Sanskrit word means taste, desire and deep longing. This powerful word also represents tongue and taste buds.

What is Jihvā for Ingredients?
I believe for Jihvā to happen, it’s all in the ingredients and how they are prepared. Jihvā for Ingredients (JFI) is an online monthly food event, celebrating the Ingredients and what they can do for our Jeevā.

What are the guidelines to host?
1. Feature any natural ingredient and there are many.
2. I’d greatly appreciate if you could pick an ingredient related to India or Indian cuisine. (Which style of cuisine that ingredient prepared is, of course it’s up to the choice of participants).
3. Announce the event on your blog by 3rd of previous month. This will give plenty of time for the participants to shop, prepare, write and post their contribution.

Interested to host the Jihva event?
Mail me stating your preference of month. Food bloggers with great passion for Jihva only, please. Once confirmed, your website name will appear on the calendar below.
Update: Thanks for your interest and participation. All slots are filled up for this Jihva year, and the invitation is closed at this time. No Emails please.

Congratulations to Jihva hosts!

Jihva Year 2008 Calendar
(May 08 – April 09)

May
Pedatha
September
Monsoon Spice
January
Ammalu’s Kitchen
June
My Creative Ideas
October
Tasty Palettes
February
Sometime Foodie
July
Live to Eat
November
Cooking for All Seasons
March
Paajaka
August
Soul Food
December
The Cooker
April
Roma’s Space

Posted by Indira©Copyrighted in Jihva For Ingredients (Thursday April 3, 2008 at 6:05 am- permalink)
Comments (14)

The New Home of Mahanandi: www.themahanandi.org

Pudina Pachadi with Peanuts

Pudina Pachadi with Rava-Dill Idles
Pudina Pachadi with Dill-Rava Idlies ~ Brunch Today

This is the recipe that made a Pudina convert of me. My ammamma (grandmother) served it one fine morning many moons ago with moonlight like idlies and that was it. The same exact recipe has been followed by my mother and now by me. Combine our ages, the recipe must be at least hundred years old. Only thing that has changed is the method of grinding, from mortar and pestle to Sumeet mixer.

Recipe:

1 bunch fresh pudina (spearmint)
1 onion and 4 green chillies
Marble-sized tamarind pulp
1 tablespoon peanut oil
¼ teaspoon cumin
½ teaspoon salt, or to taste
½ cup roasted, unsalted peanuts

Soak tamarind in quarter cup of warm water for about ten minutes to soften, so that it can blend well. Meanwhile wash and pluck the pudina leaves and also tender stems. (Two cups tightly packed.) Peel and slice onion to big chunks. Cut chillies to two pieces.

Heat oil in a cast-iron skillet to a smoking point. Add and toast cumin for few seconds. Add the onion and chillies. Saute to pale brown. Remove to a plate. Then in the same skillet, add the pudina and saute until leaves collapse. Remove to a plate. Wait for the contents to reach room temperature.

Take peanuts in a Sumeet style mixer or blender. Pulse for few minutes. Then add the roasted onion, chilli, cumin and mint leaves. Also salt and the tamarind along with the water it soaked in. Puree to smooth paste. Add water if necessary, about another half cup for easy blending.

Pudina pachadi is best eaten the day it is made. It is good with a variety of savory recipes. Adds a refreshing minty sparkle when eaten with breakfast items like idly, dosa, upma and pongal, and also when applied on chapati, roti or when mixed with rice and dal.

Roasted Pudina Chutney Contents in a Cast-iron Skillet Pudina Pachadi with Rava-Dill Idles
Roasted Peanuts, Mint, Onion and Chillies in a Cast-iron Skillet…
Pudina Pacchadi with Dill-Rava Idlies

Health Labels:
Traditional India-Vegan, Amma
Mint: Rich source of Iron, Vitamins. More here.
Peanuts: Good source of heart-healthy monounsaturated fats and Vit E
Cumin and Chillies: Aid digestion and well-being

Posted by Indira©Copyrighted in Amma & Authentic Andhra,Mint,Peanuts (Wednesday March 19, 2008 at 11:40 am- permalink)
Comments (2)

The New Home of Mahanandi: www.themahanandi.org

Bottle Gourd with Chana Dal

Sorakaya Sanagabedala Kura

Bottle Gourd (Sorakaya, Dudhi, Lauki, Opo Squash)

I love this 20-minute preparation very much. The pale green beauty, Sorakaya is simply seasoned to show off its supple texture and slight sweet flavor. Like many recipes from my home, Nandyala, the flavoring is daal. And in this dish it’s the tasty and healthy chana dal. Not only traditional, recipes like these are also waist-friendly and stamina building. They will be part of my diet and featured frequently at Mahanandi, as I start to prepare for my trip to India late this summer.

Cook this kura with young and fresh looking sorakaya for best results.

Recipe:

Soak quarter-cup chana dal in water for at least 30 minutes.

Peel the skin, and cut the sorakaya (bottle gourd) into half-inch cubes. (I added 3 cups.)

In a pot, add and heat a teaspoon of oil. Add a pinch each cumin and mustard seeds. And also a pinch of asafoetida (hing, inguva). When the mustard seeds start to pop, add the rehydrated chana dal. Stir-fry for about two minutes.

Then add the bottle gourd cubes. Sprinkle ¼ teaspoon turmeric and ½ teaspoon red chilli powder. Also about quarter cup of water. Mix. Cook, covered on medium-heat, until the white bottle gourd cubes turn to translucent pearl like.

Stir in quarter teaspoon salt and a teaspoon each – jaggery and coconut gratings. Mix and cook for few more minutes. Serve immediately. (Sorakaya Kura is a wet preparation, but with no sauce or gravy.)

To serve, heat a chapati. Place a big spoonful of kura in the middle and spread, leaving about an inch border. Fold and roll to wrap. Eat.
(Sorakaya kura is good with chapati only, and not that good with rice.)

Health Labels:
Vegan, Waist-friendly
Sorakaya (bottle gourd): Pitta pacifying vegetable
Chana dal: Known for its anti-diabetic properties
Spices-cumin, mustard seeds, hing, turmeric – aid digestion and well-being

Bottle Gourd (Sorakaya, Dudhi, Lauki, Opo Squash)
Sorakaya Kura Wrapped in Chapati, with Steamed Carrots on the Side ~ Meal Today

Posted by Indira©Copyrighted in Amma & Authentic Andhra,Chana Dal,Indian Vegetables,Sorakaya(Dudhi,Lauki) (Monday March 10, 2008 at 5:34 pm- permalink)
Comments (3)

The New Home of Mahanandi: www.themahanandi.org

Dazzling Dals ~ Punjabi Tinda Dal

Punjabi Tinda

Pretty looking Punjabi Tinda is a type of winter squash, common to north India. This is a seasonal vegetable and available at Indian grocery shops – fresh, frozen and also preserved in brine, in ready to use tins. Punjabi Tinda is easy to recognize. Pleasant pale-green color and perfect round shape, they resemble green tomato or green apple in color, shape and size. The skin is tough though, needs peeling, or scrubbing. When cut open, you see firm flesh in snow-white color, and seeds will be in white or brown color depending on the maturity of the gourd. Punjabi Tinda can be steamed, stuffed, or stir-fried. It has sweet taste with a light papaya scent. Absorbs flavors well and tastes superb in strong-sauced curries and with dals.

Punjabi tinda was introduced to me by Deviji, the kind neighbor we had when we lived in Pittsburgh. She is about my mother’s age and came to Pittsburgh to visit her son. She stayed for about six months. We struck a friendship through our interest in cookery. She couldn’t get enough of my idly, dosas and I of her traditional Punjabi cooking. Together, we would prepare an elaborate meal combining both south and north Indian dishes, have a nice lunch and save the rest for dinner. She is a military wife, traveled all over India with her husband. She is like Annapoorna and Saraswathi when it comes to food and knowledge. I learned so much from her about ingredients and techniques that were new to me. There is nothing that compares to first hand learning that comes through the interaction with an experienced person. This rich experience started with just a “hallway hello”. And that was the best experience I ever gotten for a friendly hello.

The following recipe is from Deviji. Punjabi Tinda cooked with toor dal and seasoned with tomato, onion and tamarind. A very good dal!

Punjabi Tinda
Punjabi Tinda ~ Whole, Halved and Cut to Chunks

Recipe:

¾ cup toor dal
1 Punjabi tinda, peeled and cut to big chunks
Tomato and onion, one each and 6 green chillies, cut to chunks
Tamarind pulp – two teaspoons or to taste
Turmeric and Salt – to taste or quarter teaspoon each
Popu or tadka ingredients

Take toor dal and two cups of water in a pressure-cooker.
Cook to soft, and then mash the dal to smooth. Keep aside.

In a pot, heat oil and do the popu(toast cumin, mustard and curry leaves in oil).
Add Punjabi tinda, tomato, onion and chillies to toasted popu. Saute to tender.
Stir in tamarind, salt and turmeric.
Add the cooked toor dal and about one cup of water.
Simmer for about ten to fifteen minutes.
Serve or spoon into a small bowl and enjoy with rice or chapatis.

Dal Prepared with Punjabi Tinda
Punjabi Tinda Dal with Rice and Sliced Pears ~ Light Lunch Today

Posted by Indira©Copyrighted in Indian Vegetables,Punjabi Tinda (Monday October 29, 2007 at 1:47 pm- permalink)
Comments (12)

The New Home of Mahanandi: www.themahanandi.org

It’s Chakalaka, Baby!

Chakalaka ~ South African Vegetarian Dish
Chakalaka

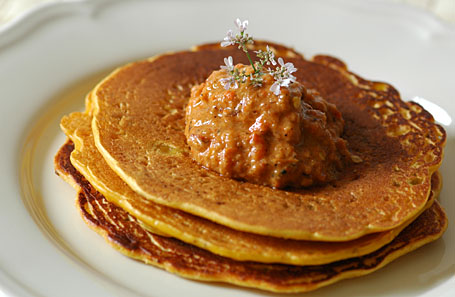
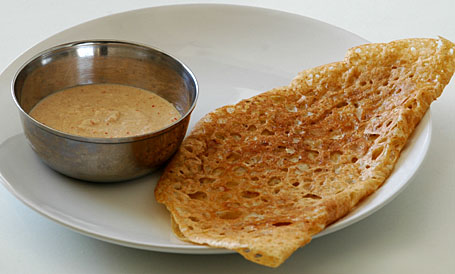
African food, at least here in the west, is usually restricted to East African staples like the delicious Ethiopian dosa, the Injera or entrees such as the equally delectable Moroccan chickpea stew (normally served over couscous) common to North Africa.

But what of the quintessentially South African Chakalaka?

As one examines the recipe, it’s not hard to imagine South African cooks venturing out into their vegetable garden one hot day, picking onions, red peppers, tomatoes and any other readily available seasonal produce. As the vegetables cooked, they probably craved some of the flavors they remember smelling as they walked down a street with Indian houses. Inspired, they might have thrown in a liberal dose of curry powder into the simmering vegetables in the pot. Since many variations also include tinned baked beans, hungry laborers might have adapted it as a quick and satisfying one-pot meal at the end of a hard day of slogging it in the gold mines.

With my well-equipped Indian kitchen, Chakalaka was a breeze to whip up. Indeed, the Indian influences are not surprising. Indians have been in South Africa longer than Caucasians have been in Canada! So at least for 7-8 generations. In fact, our beloved Mahatma Gandhi cut his revolutionary teeth in South Africa.

But back to Chakalaka (don’t you just love the sound of the name?)

While the jury is still out on whether Chakalaka is a chunky ketchup or a sauce or a cooked salsa (could be either); on whether it should be served as a side dish or a condiment (served as both) and if it should be eaten hot or cold (served either way), this spicy and always vegetarian concoction has now come to be identified as the definitive taste of South Africa. There’s even a restaurant in London named for this dish. Featuring a standard base of onions, tomatoes and peppers; this versatile dish is open to endless experimentation.

Other bloggers tell us that traditionally, Chakalaka is often served as a sauce with a maize porridge (Mielie Pap) that is eaten predominantly by the local black population. It’s also served with bread or the ragi-like Samp, made of maize. It can also be spotted as an accompaniment at South African barbecues called Braais (pronounced “bry”, rhyming with the word “cry”)

In the spirit of making a mean Chakalaka that is true to its African roots as well as its spirit of assimilation and innovation, my version is based on a number of recipes found online as well as one that was featured in the Toronto star.


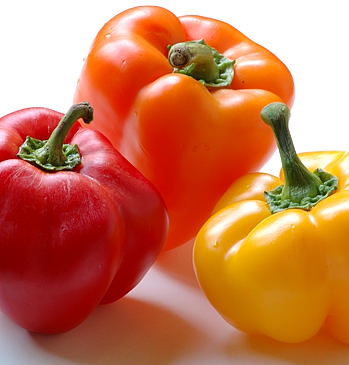
Red, Orange and Yellow ~ Peppers in Autumn Colors

Recipe:
(Makes enough for approx 30 tablespoon servings)

2 tablespoons of sunflower oil
1 inch piece of ginger, peeled and finely diced
2 cloves of garlic, peeled and finely diced
4 fresh green chillies, slit
1 big red onion, finely chopped
A pound (4 to 6) juicy tomatoes, finely chopped
3 bell peppers, chopped into 1cm X 1cm pieces
2 carrots and 2 potatoes chopped into 1cm X 1cm pieces
Curry powder – 1 heaped tablespoon.
Red beans – one cup, pre-soaked and pressure-cooked to tender
Salt – one teaspoon, or to taste
Fresh coriander for garnish

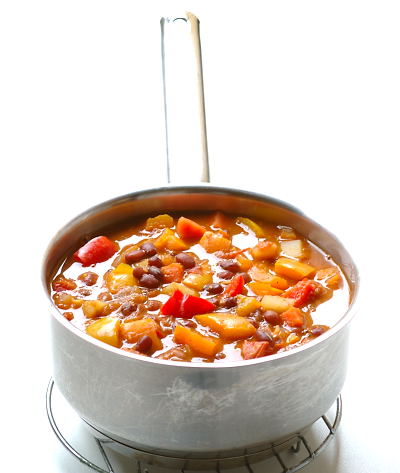
In a saucepan, heat up the oil and saute ginger, garlic, chillies and onions to soft. Add the salt and curry powder. Add the tomatoes and cook till mushy and of sauce consistency. Add peppers, carrots and potatoes. Cook till they are of a desired softness. Add the red beans and cook for 5-10 minutes. Remove from heat and add coriander. Check seasoning levels and serve with rice or breads of your choice.

A small confession. After adding the beans, I tasted it and found the heat was a bit too much. So I caved and added a teaspoon of jaggery at the end. Unsuspecting victims, tasters of the dish said it took them to whole new levels of delayed heat which overwhelmed the palate after the initial deceptive sweetness. But they all agreed they couldn’t get enough of it!

Chakalaka with Chapatis and Pomegranate
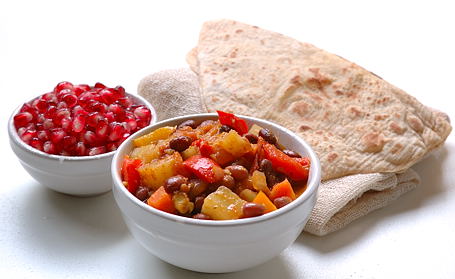
Chakalaka with Chapatis and Pomegranate ~ Meal Today

~ Article Contributed by Janani Srinivasan
Photos by Indira Singari.

Kitchen Notes:
Other vegetables can also be added to Chakalaka – cauliflower, zucchini, string beans etc
For curry powder – if you have access to it, I recommend the fiery Sri Lankan Niru brand powder so ubiquitous in Toronto. If not, any other store-bought or homemade will do. The South African recipes recommend a local brand called “leaf masala”.
To be true to the grassroots appeal of this dish, you could use a can of baked beans from the local supermarket. Vegetarians check labels to ensure it’s free of lard or any other animal ingredients. If you can soak your own from scratch, that’s even better.
More on Chakalaka : Chakalaka 101, and Culinary Musings from Cape Town

Posted by Indira©Copyrighted in Bell Pepper,Janani Srinivasan,Peppers,Red Beans (Chori) (Thursday October 11, 2007 at 6:30 pm- permalink)
Comments (26)

The New Home of Mahanandi: www.themahanandi.org

Gold and Red Beets Curry

Shopping at farmers markets is a great experience. Here, the atmosphere and the hungama usually resembles a pelli-chupula party than a humble raitu bazar. The bridegroom is the fresh produce and the merchants are the proud papas and mamas.

“We did nothing but best for our produce. Actual soil, real Sun and no chemical sprays. It’s all ORGANIC.” They boast.

“How much? 10? What? Are these for real?”, a skeptical smile.

“Do you want nutrient-rich experience and a blessed, healthy life or not?” The looks say it all.

“How can a poor man stand such times and live?” No such soulful cry from the surrounding performing artists.

Natural yet painfully artificial, it’s different kind of atmosphere here. But the lure of open air shopping is irresistible, so I go. In between the greediness, there are always few good stalls with decent prices. At one such stall, I purchased the gold and red beets last weekend. I have added the kobbari kaaram and prepared a curry for meal today. With kobbari kaaram at hand, it’s real easy to create a multitude of habit forming dishes. And, the sweet beets love the spicy kobbari kaaram touch.

Gold and Red BeetrootsGolden and Red Beetroots
Gold and Red ~ Beaming Beets

Recipe:

Gold and red beetroots :
Peel, cut to thin rings and then dice to small pieces, like shown in the image, one cup each
Chana dal – 2 tbs, presoaked in water for 30 minutes beforehand
(added for it’s sugar-control properties and nutty crunchiness)
Kobbari Kaaram – 4 tablespoons
Turmeric and salt to taste or ½ teaspoon each
For popu or tadka: 1 tablespoon ghee, a curry leaves sprig and
¼ tsp each -cumin and mustard seeds

In a wide skillet, heat the ghee until a curry leaf tossed in it sizzles. Keep the heat to medium. Add the curry leaves and toast to pale gold color. Then, toss in the cumin and the mustard seeds. When seeds start to pop, add the chana dal and beets. Stir-fry for couple of minutes and then sprinkle about two tablespoons of water. Cover the skillet and steam-saute the pieces to tender, mixing in-between on medium-low heat. When the beets reach the softness you desire, then sprinkle the kobbari kaaram, turmeric and salt. Mix and cook couple of minutes. That’s it. A colorful sidedish would be ready to serve with rice, chapati or pasta.


Rice mixed with Gold and Red beets Curry, Mudda Pappu with Ghee and Pickled Cucumbers ~ Meal Today

Posted by Indira©Copyrighted in Beetroot (Tuesday August 21, 2007 at 10:14 pm- permalink)
Comments (18)

The New Home of Mahanandi: www.themahanandi.org

Previous Page »