Mahanandi

Living in Consciousness ~ Indi(r)a’s Food and Garden Weblog

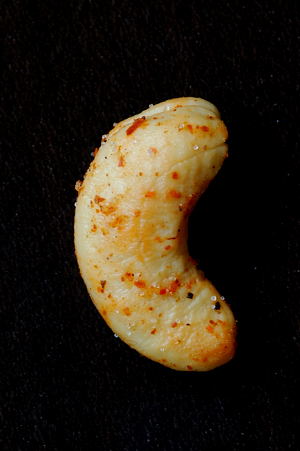
Karam Jeedipappu (Masala Cashews)

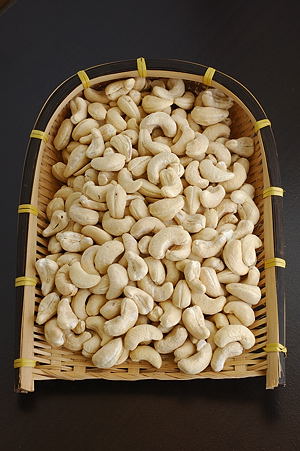
Jeedipappu (Cashews, Kaju)
Cashews ~ Imported from India

I feel like I am also an expert in cooking. But I rarely get a chance to make something and post on this website. I have few favorites, and karam jeedipappu (can also be called masala cashews) is one of them. The process seems simple, but one has to do it a few times to get perfection.

Needed ingredients:
1. 1 lb cashews
2. 1/2 cup ghee
3. 1/2 teaspoon chilli powder
4. 1/2 teaspoon salt
6. 1 pinch powdered pepper

Needed utensils:
1 thick bottom skillet
1 vessel to mix masala
1 wide plate to spread cashews and sprinkle masala

Recipe:
Take cashews in a clean, wide plate.
Remove any small pieces or broken bits of cashews.
Heat the ghee in a wide, thick bottom skillet to medium-high heat.
Take half of the cashews and roast by continuously stirring to pale red.
Remove the cashews immediately from the skillet into a wide vessel.
Sprinkle a quarter of the masala powder on the hot cashews and shake the vessel well to spread the masala evenly on all the cashews.
Next, spread the cashews into a wide plate and sprinkle another quarter of the masala evenly on the cashews.
Repeat the process for the other half of the cashews.
Let the masala cashews cool for about an hour. Enjoy!

Notes:
Frying of cashews in ghee must be done in two batches, as the ghee would not be sufficient to roast all cashews. Care must be taken not to burn/black the cashews.
The reason why I have added masala in two stages:
When masala powder is sprinkled and tossed in the vessel first time, masala powder and all excess ghee sticks to the surface of the vessel. When cashews are spread in a wide plate and masala is sprinkled on them, masala gets coated well to the cashews.

Masala Jeedipappu (Masala Cashews)
Masala Cashew ~ A Portrait

~ By Vijay Singari

Posted by Indira©Copyrighted in Amma & Authentic Andhra,Cashews,Vijay Singari (Wednesday June 25, 2008 at 5:31 pm- permalink)
Comments (49)

The New Home of Mahanandi: www.themahanandi.org

Tuning into Mandoline

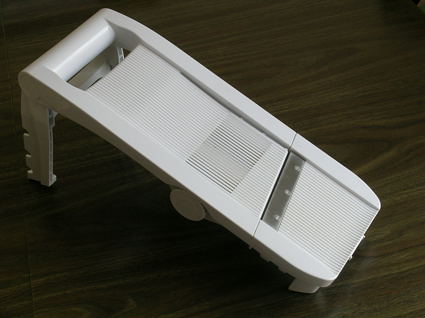
My Mandoline
My 8-year old Mandoline

I tune into the radio when I am in the kitchen. The relaxing talk and tunes from radio help to make the routine job of cutting and cleaning go easy.

Just like music, mandoline is a nice thing to have in a kitchen. It makes it a breeze to prepare vegetables for salads, curries and raitas. And also for chips and bajjis. The replaceable inserts that come with mandoline are extremely useful for different styles of fine and uniform chopping. I use mandoline regularly to cut vegetables like carrots, potatoes, karela and cabbage. Also beetroot, cucumber, plantain and radish. Time saved on cabbage cutting alone makes the mandoline a must have in the kitchen, if you ask me.

Cooking can be a satisfying and enjoyable activity when we have right tools and happy vegetables. For me, a sharp mandoline with its quick and clean cutting blades is the right tool that will make chopping vegetables a happy job.

How about you? Are you a fan of Mandoline? Here are some mandoline tunes from Amazon.com (plastic and stainless steel).


Tools and Utensils from My Kitchen:

Grain Mill (Tiragali)
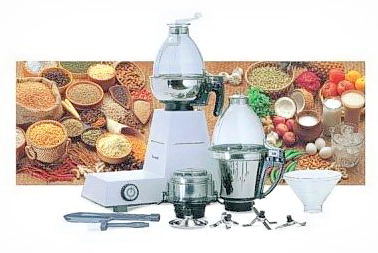
Sumeet Mixer and Grinder
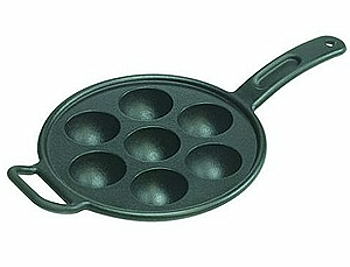
Skillet to Preapre Pancake Puffs and Ponganalu

Posted by Indira©Copyrighted in Indian Utensils,Mahanandi Selections (Sunday May 25, 2008 at 8:31 pm- permalink)
Comments (19)

The New Home of Mahanandi: www.themahanandi.org

Mahanandi Selections ~ Grain Mill

I often get asked via comments and email, to recommend cooking utensils and products. I am extremely particular about the products that I buy for my kitchen. I wasn’t sure my taste is your cup of coffee, so I was reluctant all these years. Now, I have decided to take up the challenge. “Mahanandi Selections”, the shopping suggestions series is going to be a new one on Mahanandi and features products that I have at my home or would like to have in my kitchen.

I hope you find this new series interesting and useful.

double_curve.gif

Grain Mill (Issurayyi, Tiragali)


Image courtesy: Life in the Holyland

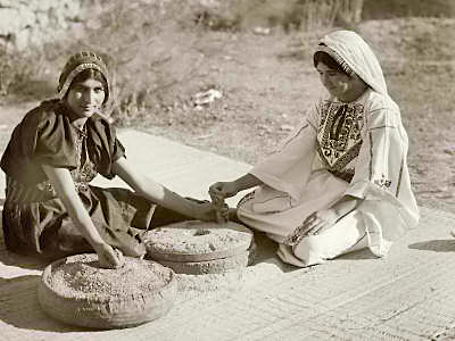
Back home, my family uses stone-made grain mill, similar to the one shown in the photograph to mill grains. This circular shaped stone mill is called “Issurayyi and Tiragali” in my language Telugu. We use it mainly for making flour for sweets like sunnundalu and attarasalu (adhirsam). The flour fineness matters a lot for these traditional sweets. Too fine powder, the sweet will stick to the roof of the mouth. Too coarse, it would be difficult to shape them. The advantage of stone-made grain mill is we can manually control the milled particle size, which in turn helps to make perfect sweets.

The one at my parent’s home is much smaller in size. The circular stones are about the size of big dinner plates and about the thickness of steroid-fed biceps muscle. It’s quite old and my mother keeps it in good condition. I remember turning the stone mill to help my mother.

This is how the stone grain mill works: A jute cloth will be placed on the flour and the stone mill will be placed on the cloth. The mill is essentially made of two circular stones. The lower circular stone stays stationary and the upper stone moves. It has an upright handle on the corner and this is used to turn the stone. The grain will be poured, a handful at a time, through the hole in the center of upper millstone, while the stone is turned continuously. Friction and weight created by the upper stone mills the grain. And the flour will get gradually pushed to the edge and falls out on to the cloth. Depending on the speed at which it is rotated and by the strength applied, the milled grain consistency varies – from fine, to medium to coarse. It may sound complicated but the whole thing operates on simple friction based principle. Looks wise Issurayyi is a real beauty. Operating wise, it’s a great way to keep the upper hands slender.

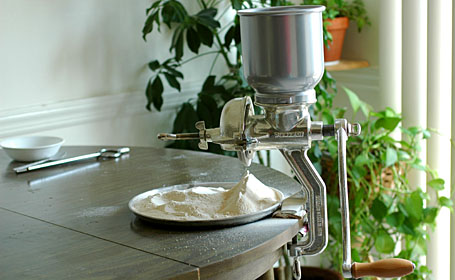
After moving to US, I was looking for a grain mill that operates in issurayyi style. I found one few years ago at a shop called Tuesday Morning. It’s a Porkert brand grain mill. A different look and feel but operates on the same principle. A big plus is it is very well made and of quality materials. The one I have has both ceramic and metallic burr plates. Ceramic ones are used for grinding oily nuts etc and metallic burr plates are great for grains and lentils like rice, urad dal etc. We have to assemble the parts and fix the machine to a table and operate it manually by rotating the handle. I have been using it to prepare sunnundalu mainly. This sweet is that important to us and cannot be made of flour from a coffee grinder or Sumeet style mixer-grinder.

If you have a traditional preparation requirement, where the milled grain size matters a lot, then go for this type of grain mill. It’s a hard, sweat inducing upper arm workout but the end result is definitely worth the effort. I have to warn you though, these manually operated machines are not magic abracadabra kind of things. A real zeal and know-how is essential for good experience.

Important:

1. You need to make some trials before you could get the required flour fineness. This could be done by adjusting the gap between the millstones, handle turning speed, and by adjusting the quantity of grains through the hopper.

2. This machine looks and works great. But also consumes considerable amount of time and effort to get the required results.


Machine Details

*****************

PORKERT’s Kitchen Grinding Mill ~ A Kitchen Gadget that I Own
Preparing Sunnundalu Sweet at home with PORKERT’s Kitchen Grinding Mill, Type 150

To purchase:

Porkert’s Manual Grain Mill

Different types of Grain Mills from Amazon.com.

Previously on Mahanandi Selections :
Sumeet Mixer Grinder
Aebleskiver Skillet (Ponganalu/Paniyaram/Uniyappam Pan)

double_curve.gif

Note: The things that I feature at ‘Mahanandi Selections’ (MS), reflects my own cooking style. You may regard a tool that I deem essential as an expendable thing or vice versa. I have absolutely no interest to convince you otherwise. It is good to be realistic about our own capabilties, limitations and what we can afford.
MS Comment Policy: Brand wars and malicious hearsay with intent to damage a brand reputation – comments of this nature will get scrubbed from comment space.

Posted by Indira©Copyrighted in Amma & Authentic Andhra,Indian Kitchen,Indian Utensils,Mahanandi Selections (Friday August 3, 2007 at 1:30 pm- permalink)
Comments (30)

The New Home of Mahanandi: www.themahanandi.org

Mahanandi Selections: Sumeet Mixer

I often get asked via comments and email, to recommend cooking utensils and products. I am extremely particular about the products that I buy for my kitchen. I wasn’t sure my taste is your cup of coffee, so I was reluctant all these years. Now, I have decided to take up the challenge. Mahanandi Selections, the shopping suggestions series is going to be a new one on Mahanandi and features products that I have at my home or would like to have in my kitchen.

I hope you find this new series interesting and useful.

double_curve.gif

SUMEET MIXER GRINDER

Sumeet homepage: Sumeet.net
(I own a Sumeet and I’ve been using it for almost six years. Great Machine!)

Product Features: The Multipurpose Asia Grinder was created specifically to tackle the tough DRY & WET grinding tasks required in the diverse cuisines of India. Yet it is equally at home where grinding is vital to the cuisines from other parts of the world, (Mexican Moles, Thai Green Curry, Harissa, etc). The Asia Grinder effectively grinds Dry or Wet ingredients into fine powder or a smooth thick paste, from as little as 50 grams to as much as 400 Grams in less than 2 minutes. Soaked Lentils, Rice, Coconuts, Chilies, Herbs, Ginger, Garlic to name a few, can be ground without adding a drop of water. A feat only possible using Stone & Pestle. It comes with 4 Interchangeable blades for various tasks such as Blending, Whipping, Mincing, Grating etc. The Small Quantity Grinder Jar is ideal for small amounts of dry and wet grinding, be it fresh coffee powder or quick chutney.

Heavy Duty Indian Mixer/Grinder has Safety Lock System, 110 Volt. 3 Stainless Steel Jars with a “Double Wall Stainless Steel” construction, a redesigned integrated blade and lids with a more user friendly snap-in locking system.

Product Reviews:

From Amazon: “It can take a kitchen aid for breakfast and black dekker for lunch and still have appetite for a couple of sun beams.”

From Food Bloggers: Barbara of Tigers and Strawberries often mentions Sumeet in her well detailed recipe instructions. Her review:

“I am very fond of and use my Sumeet Multi-Grind all the time. It is a really fine piece of equipment that will grind up any wet or dry ingredient that you would have into a very smooth paste (or powder if all the ingredients are dry), including rock hard galangal and chunks of cinnamon stick, without fail. The parts of the machine that come into contact with the food are all dishwasher safe, so they are simple to clean. I have had it for nearly eight years and have used it at least four times a week, and it has never choked, failed me or even considered not running.”

Price Details:
Ships and Sold via Amazon.com
Sale Price: $169.00 ($174.99)

For news and new product information, here is the Sumeet homepage: Sumeet.net

Last week on Mahanandi Selections :
Aebleskiver Skillet (Ponganalu/Paniyaram/Uniyappam Pan)

Posted by Indira©Copyrighted in Mahanandi Selections (Friday July 27, 2007 at 3:34 am- permalink)
Comments (42)

The New Home of Mahanandi: www.themahanandi.org

Mahanandi Selections : Aebleskiver Skillet

I often get asked via comments and email, to recommend cooking utensils and products. I am extremely particular about the products that I buy for my kitchen. I wasn’t sure my taste is your cup of coffee, so I was reluctant all these years. Now, I have decided to take up the challenge. Mahanandi Selections, the shopping suggestions series is going to be a new one on Mahanandi and features products that I have at my home or would like to have in my kitchen.

I hope you find this new series interesting and useful.

double_curve.gif

Lodge Pro-Logic Cast-Iron Aebleskiver Pan

(Ponganalu/Paniyaram/Uniyappam Pan)

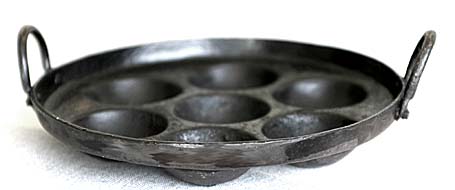
Product Features: Cast-iron aebleskiver pan with 7 slots for creating Ponganalu, Paniyaram and Pancake puffs. Preseasoned with vegetable oil formula and ready for immediate use. Cast-iron surface heats slowly and evenly to prevent burning. Nonstick, rustproof finish. Cleans easily; hand wash only. Includes long handle and opposite helper handle. The impressions are 3 1/4″ in diameter and 1″ deep.
Product Reviews: Click Here.

Ships from and sold by Amazon.com.
Sale Price: $19.99 (Reduced from 31.99).
Eligible for FREE Super Saver Shipping on orders over $25.

Traditional Recipe Ideas with Cast-iron pan:

Ponganalu ~ From Andhra Pradesh, India
Spinach Ponganalu with Sarapappu ~ From Andhra Pradesh, India
Kuzhi Paniyaram ~ From Tamilnadu, India
Ravva Unniyappam (Sooji Pancake Puffs) ~ From Kerala, India
Sweet Unniyappam ~ From Kerala, India
Deep Fried Unniyappam ~ From Kerala, India
Danish Pancake Puffs with Mango Sauce
Danish Doughnuts

Posted by Indira©Copyrighted in Mahanandi Selections (Friday July 20, 2007 at 7:36 pm- permalink)
Comments (22)

The New Home of Mahanandi: www.themahanandi.org

Traditional Indian Iron Flat Pans and Skillet (To Cook Chapati, Roti, Dosa & Ponganalu)

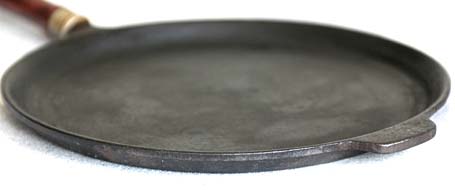
For this week’s “Indian Kitchen” and in response to requests about my cast iron cookware – here are some my very well seasoned cast iron flat pans and skillet that I use regularly and specifically to prepare chapatis, sorghum roti, dosa and ponganalu.

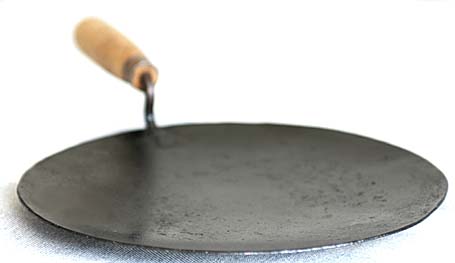
Chapati pennam
Traditional iron pan with thin bottom to prepare chapatis(parathas, wheat rotis) – brought it from Nandyala (my hometown in India).

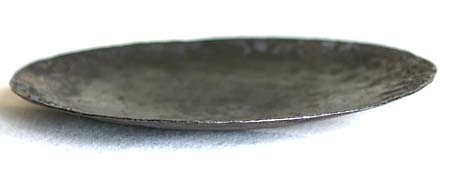
Roti Pennam to prepare Sorghum Roti
Traditional iron pan with round bottom to prepare Jonna rotte(Sorghum roti) – Brought it from Nandyala

Dosa Pennam
Thick bottomed, flat cast iron pan to prepare dosa, utappam, pesarattu etc – bought this at ‘Target’.

Ponganala Pennam
Traditional iron skillet with round impressions to hold the batter, to cook a South Indian breakfast called “ponganalu” – brought it from Nandyala.

Posted by Indira©Copyrighted in Amma & Authentic Andhra,Indian Kitchen,Indian Utensils (Sunday March 19, 2006 at 3:24 pm- permalink)
Comments (67)

The New Home of Mahanandi: www.themahanandi.org

‘Jaadilu’ – To Store Pickles (Ceramic Jars/Bharani)

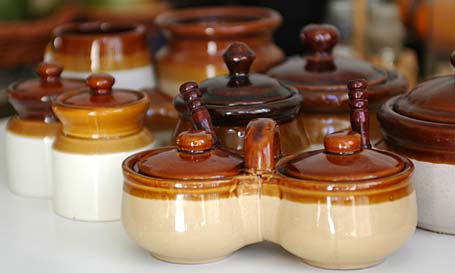
Jaadilu

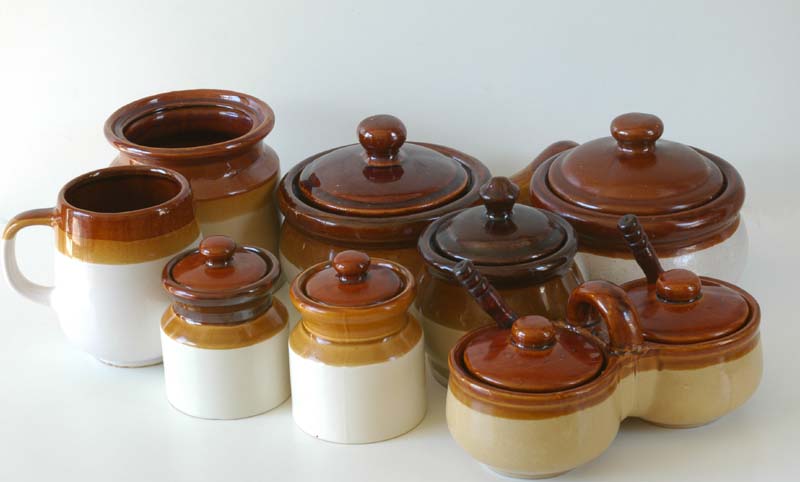
These are the kind of jars, my family uses back home in Andhra to store pickles like mango, lime and amla etc., They are our traditional kitchenware and I love the coloring, the shape of these beautiful ceramic jars. It’s been my hobby to collect these, here. So far I found the ones in the photo, from garage sales, flea/farmer markets and thrift shops etc., The price range I paid for these was 25 cents to 5 dollars, depending on the size.

Jaadilu- to store pickles

Ceramic Pickle Jars and Ceramic Mug – My kitchen collection (click on the image to enlarge)

I use these jars to store pickles just like how they are used in India. I also use them to store ghee, spicy powders, snacks like roasted peanuts etc., I love them because they connect me to my homeland. So pretty to look at, they are my treasure finds.

Do you collect kitchen things? I’d love to read about your kitchen collection. Write a comment or post at your blog, showoff your pretty stuff. You’re meme‘ed.:)

Posted in response to this comment.

Posted by Indira©Copyrighted in Indian Kitchen,Indian Utensils,Zen (Personal) (Saturday March 18, 2006 at 2:08 pm- permalink)
Comments (44)

The New Home of Mahanandi: www.themahanandi.org

Idly (Idli, Iddenlu)

Our love for idlis, the soft, fluffy white, round discs made of rice and lentil batter, began when we were children. Two, three year old babies with tiny idlis in their hand, playing around mom, is a common scene you see in many Indian households. As we grow up, the role of idlis also changes – first as toddlers’ teething food, to childhoods play, fun kind of food. Then in teenage years, the kind of breakfast we really enjoy eating without complaining much. Later In twenties and thirties – we try, struggle and wonder how folks back home make those fluffy cloud like visions of idlis so effortlessly. Try as we may, we can’t recreate those beauties here, because the weather, the grain and even the water is different here.

Method of making idlis is very simple yet little bit time consuming, only in the sense that you have to plan ahead. Whether idlies turn out like cotton soft or solid, white round bricks – it all depends on fermentation (that means where you live and how you grind the batter etc.,). Most of the times, the recipe I follow gives good, decent idlis, considering I live in a very cold climate area. See, if my recipe works for you.
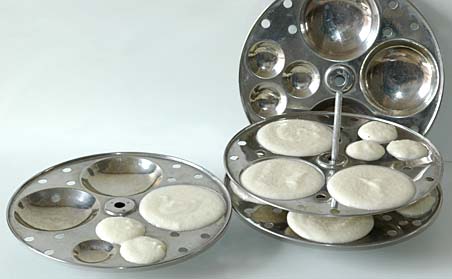
Idly stand and idly plates
Idly stand and idly plates, some filled with urad dal– rice ravva batter

Recipe:

Urad dal and rice ravva (cream of rice, rice suji) in a ratio of 1:2
1 tsp of fenugreek seeds
Pinch of baking powder
Utensils
Blender/wet grinder
Idly stand with idly plates (see the photo above)
And a vessel with tight lid (suitable to fit idly stand)

Soak urad dal in just enough water overnight or for at least 4 to 6 hours.
Drain the water and keep the drained water aside.
Grind the dal into silky smooth batter. To get the medium tight consistency, add the drained water kept aside, as needed to the batter,while grinding. Remove the batter in a vessel.
Add rice ravva and mix thoroughly without any lumps.
Keep it covered, for overnight fermentation (at least 6hours) in a warm place. By morning, the batter will be doubled in volume. Stir in salt and baking powder. Consistency of batter must be medium (like condensed milk), not too tight or too watery. Add water if necessary.
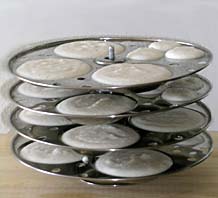
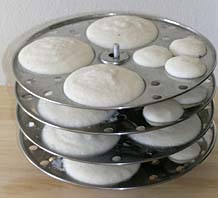
Idli plates filled with rice-lentil batter just before cooking Steamed idlies just out of the vessel
Idly plates filled with rice ravva-urad dal batter all ready for steam cooking***Idlies after steam cooking

In a big vessel (fit to idly stand) with tight lid, add about half to one glass of water and bring to a boil.

Separate the plates in idly stand; pour spoonfuls of batter in round impressions (see the photo above). Fill all the plates with idly batter and place these filled idly plates, back on the stand. Place this idly stand with filled plates in the vessel with boiling water. Cover it tightly and cook them on steam. The plates are perforated and allow the idlis to be steam-cooked evenly.

After about 15 to 20 minutes, the batter will be hardened and when touched, won’t stick to your fingers like a wet batter does. Turn off the heat and remove the idly stand from the vessel. Run a spoon under each impression to separate steamed idlies from the plate. Remove them all like this and get ready to steam the next batch of idlis.

Serve idlis piping hot with sambhar, coconut chutney and idly karam podi ~ for a traditional, proper south Indian breakfast.
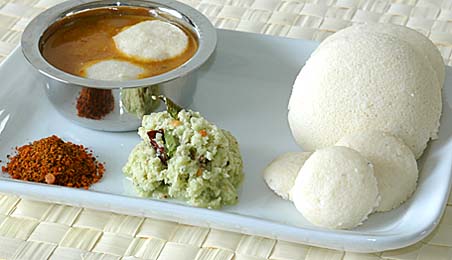
Idlies with coconut chutney, idli karam podi and shallot sambhar
Idlis with coconut chutney, idli karam podi and shallot sambhar ~ Our weekend brunch

double_curve.gif

Answering questions about my Idly routine:

I usually prepare idlis for our weekend brunch. My prep work for Saturday’s brunch of idli starts like this. I soak the urad dal on Friday morning, around 7-9 AM. It takes at least 4 to 6 hours for them to soften. Around 6-8 PM evening, I grind them into smooth, silky smooth batter. I remove the batter into a big vessel and mix up with store bought idli rava. Then I keep it covered overnight for fermentation. By morning, the batter will be fermented and changed in looks and consistency. After stirring in salt and little bit of baking powder, I pour ladleful of batter into the impressions on idly plates and steam cook them.

The tips I follow:
1. I use round urad dal(whole and white). Somehow they are better than the broken ones for idlis.
2. I soak the urad dal in just enough water and while grinding I add this drained water. This tip works only in cold climate to aid the fermentation.
3. While grinding I also add one or two teaspoons of soaked fenugreek seeds. This is an old tip, to improve the taste and fermentation.
4. Urad dal batter- the smooth the batter, the fluffy and silky, the idlis will be. Grind, grind and grind, run that blender motor until it gets hot.:)
4. Rice ravva- I use store bought kind.
5. Fermentation- I set the oven on to minimum (lowest setting/warm) for about 5 minutes, then I’ll turn it off. By the time I’m ready with batter, the oven will be warm. During bitter cold wintertime, keeping the batter in this cozy, warm oven aids fermentation process.
6. In the morning, I usually add a pinch of baking powder to the batter (old time tip).
For more tips, check out this wiki article on Idlis.

Recipe source: Amma
Posted by Indira©Copyrighted in Amma & Authentic Andhra,Rice Ravva (Cream of Rice),Urad Dal (Washed) (Tuesday February 21, 2006 at 4:50 pm- permalink)
Comments (119)

The New Home of Mahanandi: www.themahanandi.org

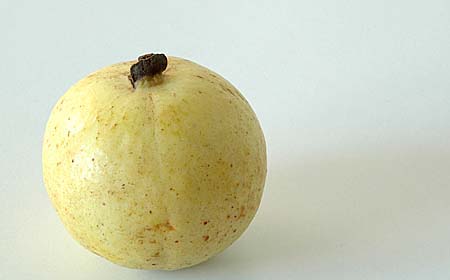
Guava (Jamapandu, Amrud)

Ripe guava:

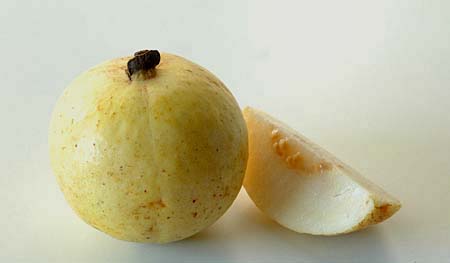
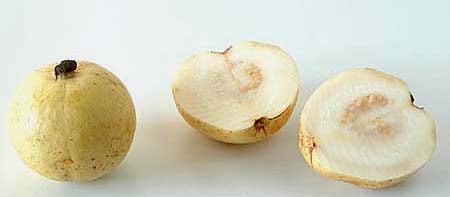
Guava, Jaama Pandu, Koiya Palam, Perakka, Peyara, Amrud

It’s has been a while since we saw and had a ripe guava. 6 years to be exact. They were not in season during our trips to Nandyala. But we got lucky in Toronto, Canada. Local Indian stores were carrying this precious Indian fruit and the real miracle is at a reasonable price.

One of life lessons, I learned is, its not good for health to feel nostalgic about home foods. But this fruit with its incredible fragrance, with just right amount of ripeness brought out symptoms of nostalgia. Eyes misted, mouth watered, brain couldn’t get enough of its smell and heart wanted more… .I don’t know when I’d have a taste of guava again, but for now, I enjoyed the fruit, feeling nostalgically delirious.

Guava , Jaama Pandu, Koiya Palam, Perakka, Peyara, Amrud

This cherished fruit with unique taste and fabulous fragrance when ripe is called Jamapandu in Telugu and ‘Guava, Amrud, Koiya Palam, Perakka and Peyara’ in other Indian languages. Ripening process makes the fruit go from hard to tender and skin colour also changes, from a shade of green to a shade of yellow. We usually eat the whole fruit including the skin and the tiny seeds, when ripe. Just sprinkle some salt, to give that perfect taste of salty sweetness. Pleasant but not flashy, both in looks and taste -that’s how I describe guava.

Ripe Guava (Jama Pandu, Amrud, Peyara)

I am glad I was able to capture the image of ripe guava for my Indian kitchen series. Even though I gave up the idea of hosting ‘Indian kitchen’ here on my blog (very time consuming), instead, I created a Flickr group to share images of Indian ingredients and utensils so that food bloggers and foodies who don’t have blogs, but interested to participate, can share images. It can also used as a group pool, so that whenever we need a photo of some kitchen thing, we can link to the image in Flickr set, instead of doing google or yahoo image search. If you are interested, join the group and share your images of Indian kitchen.

Posted by Indira©Copyrighted in Indian Ingredients,Indian Kitchen (Monday January 9, 2006 at 8:55 am- permalink)
Comments (21)

The New Home of Mahanandi: www.themahanandi.org

Indian Kitchen

Indian cuisine requires lot of ingredients and utensils which are unique to this style of cookery. When you try to find a picture or details of these ingredients on the Internet, you would seldom find any. This is especially true for some simple cooking tools like a wood masher (for preparing dal) or a spice box, vegetables like drumsticks etc.,

Wouldn’t it be great to share images of Indian Kitchen with the world? I know, I would be very happy to see images of this kind on the Net. If you are interested, join me and please post a picture of your Indian kitchen ingredient/utensil or a tool every Sunday or any day convenient for you. The item could be unique, common or anything in-between. On every Monday, I will add a link of your specific post on my website.

I thought of doing this, because it’s always a visual treat to find the images you are searching for. When these images are put on the net, search engines like Yahoo and Goggle would be able to show them for everybody’s use and ofcourse the main purpose of this fun, group project is creating an online Indian glossary in images.

All are welcome to show off their Indian Kitchen ingredients/things.

—————–************——————–

Added on November 27th, 2005

I want to do this but with the current settings and features I have on my web site, it’s not going to work as I thought of doing. So I would keep the idea of creating an online “Indian glossary in images” on hold, for a while. Currently I am working to make a detailed categories and subcategories in a new section on this website. When I complete my work on this, I will start asking for your help and participation again for “Indian Kitchen”.

You all have shown lot of enthusiasm in this project, I really appreciate your time and input. Thank you!

Posted by Indira©Copyrighted in Indian Kitchen (Saturday November 19, 2005 at 8:43 am- permalink)
Comments (27)

The New Home of Mahanandi: www.themahanandi.org

Article and Recipe Index

Mahanandi is easy to navigate, and recipes are archived in four ways.

Browse by Ingredients: Ingredients are listed in alphabetical order in category section on the sidebar of Mahanandi.

Browse by Date or Month: Recipe name appears by hovering the mouse on the calendar. Clicking on the dates in the calendar will take you to the recipe that is blogged on that day. Or click on the month in archives section and then on the date in calendar.

Browse by Title: Recipes are listed in types of meal, courses and cuisines on this page.

Browse for Indian Sweets: Sweets List

double_curve.gif

About Culinary Experience and Recipe Inspiration

My culinary life in few words:

I started out as a burper and spitter (aren’t we all?), taste tester, picky eater, ruthless critiquer (1 to 12 years age), trained under my mother’s guidance to dish washer, prep cook, line cook, sous-chef (12 to 25 years) at home. I was a partner and assistant chef, immensely benefited from my other half’s culinary wisdom and wit (25 to 30 years). I am the chief home-chef and kitchen manager at this time.
My culinary experience is a process of progression and I will always be an eager student at Mother Annapoorna’s culinary school.

Recipe Inspiration:

The main portion, about 60 percent of the blogged recipes at Mahanandi listed below, are from my homeNandyala in India.

The remaining 40 percent, inspired by my imagination and the time I spent visiting and browsing famiy, friends and fellow food bloggers real and virtual kitchens.

Index Layout

As a reader, cook, taster and enthusiast I fashioned the index page following the strict Indic culinary wisdom, on how we serve the meal in a traditional setting. This page is laid out in a way, that if you cook a recipe from each category, you would have sampled the complete “Morning to Night” meal experience of my home. The combinations and possibilities are endless. It’s very much possible to re-create the varied and myriad hues of Indian cooking – a different flavor and texture for each of its hundred thousand villages.

“Real Knowledge is to know the extent of one’s ignorance”, the old Sanskrit proverb says. I hope you find here some information and recipes which you recognise, and others which surprise and delight you enough to try them out. Enjoy!

double_curve.gif

A Daily Record: Articles, Recipes and Photos from My Home
(From March 26th, 2005 to December 30th, 2009)

Morning Meal:

Dosa, Pesarattu, and Utappam:

Idly:

Minimalism for Morning:

Ponganalu (Paniyaram)

Upma:

Refreshing Paniyam:

Vindu Bhojanam for Mid-day or Night:

(The recipe index is laid out in the traditional serving ritual of Vindu Bhojanam (feast). Water first, then salt, pachadi, podi, uragaya, teepi (sweet), kaaram (snack), festival rice, rice, pappu, kura, pulusu, sambar, rasam, perugu, and the meal ends with sweet taste of Mother Earth, the seasonal fruits like banana, mango etc.)

Pacchadi, Podi and Uragaya:

Pacchadi (using Rolu or Mortar & Pestle):

Pacchadi or Chutney (Made in a Mixer, Blender or Food Processor):

Podi (Spicy Powder):

Uragaya (Pickles of India):

Teepu (Sweets, Bharath- 101):

Festival Sweets:

Mithai:

Karalu or Snacks (Bharath):

Deep Fried in Peanut Oil

Pan-Fried:

Oven Baked:

Traditional Sun~Dried Snacks of Bharath:
(Vadiyam, Papadam, Appadam etc)

Annam & Dhanyam (Rice and Grains):

Festival Rice:

Pulao (Masala Annam, Pilaf, Fried Rice):

Ganji, Kanji or Congee

Articles on Rice and Grains from India:

Chapati, Naan, Paratha, Puri and Roti:

Pappu (Dal, Daal, Dahl):

Pappu With Kandi Pappu (Toor, Tuvar Dal):
(Pappu with Kandi pappu and vegetabels is prepared for daily meals at my home and at Nandyala.)

Pappu With Pesara Pappu (Moong, Mung Dal):

Pappu With With Masoor Dal (Red Lentils):

Pappu with Split Peas – Green and Yellow:
(Split peas are neither toor dal nor chana dal. It’s the truth!)

Chaaru, Pappuchaaru, Pacchi Pulusu, Rasam and Sambar:

Pappuchaaru, Pacchi Pulusu, Rasam:

Sambar: The South Indian Soopa
(Difference between Soup and Sambar – No vegetables are harmed (mashed) in sambar.)

Kura, Vepudu, Poriyal, or Thoran:
(Indian Salads With Minimum Saute)

Cooking cut-up vegetables briskly in a small amount of oil, stir-frying or sauteing is the most popular tenchnique that I use in my cooking. The resulting dish is called “Kura” or “Vepudu” in Telugu.

Kura, Kurma, Pulusu or Subji:

Home Classics with Fresh Vegetables

Home Classics With Beans and Legumes:

Home Classics With Paneer:

Home Classics with Egg:

Home Classics for a Potluck Party of 25:

Restaurant Popular, but to My Palate:

Adapting World’s Classics to My Palate:

Perugu, Dahi, Curd or Yogurt (Raita)

Refreshing Ice (Granita, Icecream, Sherbet):

How to Prepare? The Essentials:

Yogi Diet (Food of Fasting Days):

Vitamins for Everyday: Herbs and Spices with Recipes
(by Anjali Damerla)

double_curve.gif ***double_curve.gif

Occidental Food:

Occidental grub happens at my home occasionally. This is a record of such accidents.

Bread, Burger, Pasta and Pizza:

Bread:

Burger (Cutlet) and Sandwich:

Pizza:

Pasta or Noodles – Wheat and Rice:

Sugary Desserts Sans Western Whimsy:

Cakes and Scones Filled with Fruit and Nuts:

Clafouti, Pies and Tarts:

Cookies and Such:

Jams and Such:

double_curve.gif ***double_curve.gif

Discoveries and Divine Prasadams:

New Traditions:

Bhakti~Bhukti (Devotion Mixed with Dining):

double_curve.gif ***double_curve.gif

Cookery: Books, Food Art, Pots and Pans

Cookbook Reviews and Interviews:

Food Art:

Food Articles:

Pots and Utensils:

double_curve.gif ***double_curve.gif

The Joy of Effort ~ Personal and Team:

double_curve.gif

Posted by Indira©Copyrighted in  (Sunday July 24, 2005 at 1:47 pm- permalink)
Comments (107)

The New Home of Mahanandi: www.themahanandi.org

Lime Pickle

We Indians make pickle out of almost everything from mangoes to fish. “Even if we don’t have anything to eat, we can survive on pickle and rice” is the common dialogue in our Telugu movies between love struck hero and heroine. Father of the heroine always cautions her against hero, “If you marry him, you know what will happen to you, you have to live on pickles”. Pickles are that common in our household.

Lime pickle is particularly good because it is tangy and hot at the same time. Tastes good with dal, rasam and sambhar and on boiled eggs.

My version of lime pickle:

Lime Pickle

Take 12 limes. Wash and pat them dry. Take 4 out of them, cut them and squeeze the juice in a cup, keep aside. Cut the remaining 8 limes into 4 or 8 wedges depending on their size.

Mix the cut pieces with 6 teaspoons iodine free salt, and lime juice. Mix thoroughly. Take them in a clean, dry glass or porcelain jar with tight lid. Keep them tightly covered for about 4 days.

On 5th day – dry roast 1 tsp each of cumin, mustard and fenugreek (methi) seeds grind them to fine powder. Add this powder into the jar along with pinch of turmeric and 5 tsp of red chilli powder; mix thoroughly with a clean dry spoon.

Keep the lid tight for another 3 days, so that the lime wedges can absorb all the flavors and soften. (This time period depends on the thickness of lime rinds. If they are thin, they will soften up within a week and if they are thick, they would take atleast a month. My recipe is prepared with thin skinned, juicy limes and they changed from hard to firmly-soft in a short time.)

After that time period and just before serving the pickle:
Heat 4 tsp of oil, toast one teaspoon of mustard seeds in oil until they start to crackle and then turn off the heat. Bring this seasoned oil to room temperature and then add this oil to the pickle. Mix well and thouroughly. Serve and enjoy with rice, dal and ghee.

Pickling is like making jam. Take extra precaution in using the dry utensils, jar, spoons and your hands. Using the wet or damp things is a sure way to spoil the pickle.

I’d like to contribute something to SHF but I don’t know any sugary dishes with citrus except lemon juice with honey. So this is my hot not sugary citrus contribution to SHF. Thanks Stephanie for the suggestion.

To clear the confusion, Lemon in India = Lime in US.

Added on June 06:

Thin skinned and juicy limes are preferred for this type of pickle.

If you find them still firm even after 15 days – keep them undisturbed for one to two months -they will sure get softened. And you need to see that sufficient limejuice and salt is avialble for softening process. The pickle should never look dried out at any stage. Traditionally at our homes in India, minimum two months are given for pickles to soften and juiced up.

Usually finely ground pickle masala (cumin, mustard and fenugreek (methi) and red chilli powder) is added. And you can adjust the amount of this ground spice pickle masala to suit your taste.

Posted by Indira©Copyrighted in Amma & Authentic Andhra,Limes/Lemons (Friday May 20, 2005 at 10:58 am- permalink)
Comments (67)

The New Home of Mahanandi: www.themahanandi.org