Williams-Sonoma, the kitchenware shop that sells quality kitchen stuff, has a series of cook books – Like their shop, the cookbooks are very clean, organized, not a lot of recipes, but have an excellent presentation and gorgeous photos. The book size is not too big, not too small; they are like short notebooks with color photo on every page. Each book focuses on one topic. So far, Cookies, Cakes, Muffins, Breads and Risotto – these are the cookbooks, I borrowed from my local library and flicked through. More than anything, they are eye candy.
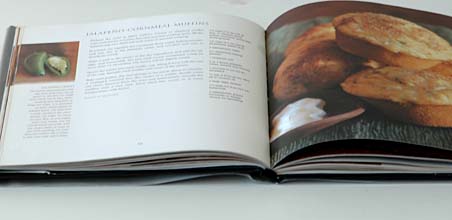
Stephanie of Dispensing Happiness, my blog friend is blogging recipes from ‘Muffins‘ cookbook. When she mentioned last week that she was going to try cornmeal-jalapeno muffin recipe, I wanted to join in and made a baking date with her. After two renewals and before returning the book to the library, I wanted to try at least one recipe. FInally last weekend, I baked cornmeal muffins from the book.
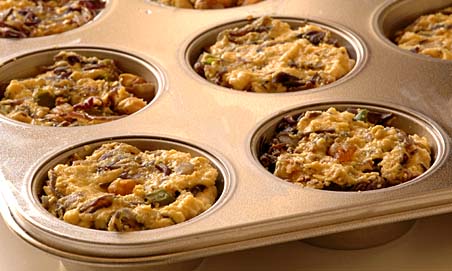
I followed the recipe mostly and also added some extras, because I was preparing these muffins for our supper. In addition to corn meal, all purpose flour, butter milk and baking powder etc, I have also added cabbage, shallot, chickpeas sauté to the cornmeal dough, so that the muffins baked would be more dinner worthy. They turned out, I can’t say excellent, but acceptable, even after all these extras. I can’t imagine the taste if I tried them bland with only just cornmeal and chillies.
Recipe:
(For 11 muffins)
1½ cups of yellow cornmeal
1 cup all purpose flour (maida)
1½ cups of buttermilk
1 tablespoon peanut oil
1 teaspoon of each – salt, sugar and baking powder
Some cheese gratings to top the muffins
Veggies I added
3 cups of finely chopped cabbage (I used red cabbage)
3 shallots and 6 green chillies- finely chopped
½ cup of chickpeas (soaked overnight)
First I sautéed the veggies together for few minutes, until they are cooked. In the meantime, I mixed all other ingredients together thoroughly without any lumps. I stirred in the sautéed veggie mixture to the dough. Greased the muffin pan with little bit of oil, leaving one muffin cup empty and filling it with water to prevent warping (following the book suggestion). Filled the muffin cups with cornmeal-cabbage dough. I also sprinkled cheese on top of some. Baked them in a preheated oven at 400 F (200C) for about 25 minutes, until they are golden.
They tasted like baked versions of cabbage bajjis (you know the kind, bajjis/pakoras – veggies mixed in a gram flour-jowar flour-rice flour dough, then deep fried — almost like that).
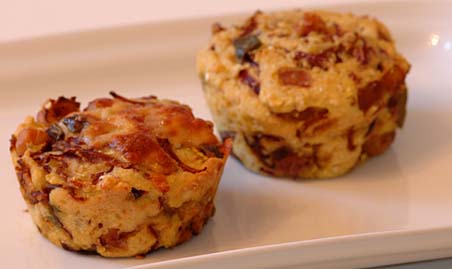
Cornmeal-Cabbage Muffins
Recipe Source: Adapted from ‘Williams Sonoma-Muffins’, page 46
Things I skipped adding (from the book’s recipe) are 2 eggs, another 1 ½ tsp of baking powder and more oil – reason for my flat muffin tops.
On a blogging break. See you all in a few days.


